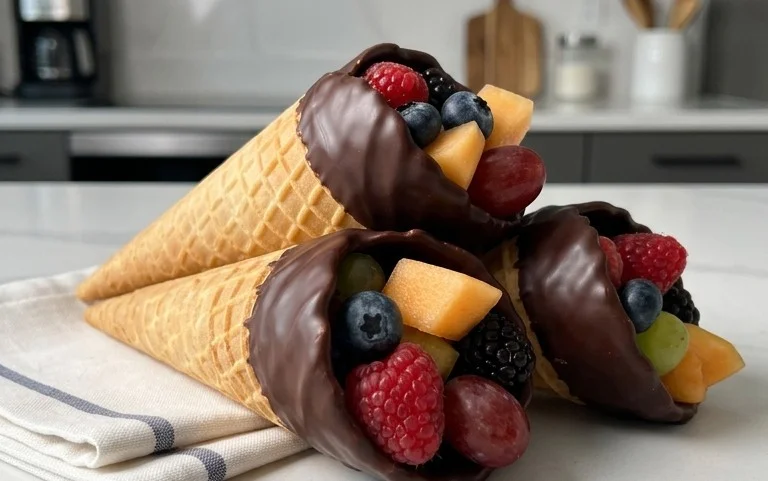
Chocolate Dipped Fruit Cones – Easy Dessert Treat
Chocolate Dipped Fruit Filled Cones are an absolute showstopper, and today I’m going to show you just how easy it is to create these delightful treats right in your own kitchen. Imagin extracte the joy on your guests’ faces when you present these edible masterpieces, a perfect blend of crispy, sweet, and fruity goodness. We all love indulgin extractg in a little something special, and these Chocolate Dipped Fruit Filled Cones deliver on every front. What makes them truly magical is the stunning visual appeal combined with the burst of fresh fruit nestled within a rich chocolate shell, all housed in a delightful cone. It’s a sophisticated yet playful dessert that’s surprisingly simple to assemble, making it ideal for everything from a casual afternoon pick-me-up to a memorable dessert for any celebration. Get ready to elevate your dessert game with these incredible Chocolate Dipped Fruit Filled Cones!
Chocolate Dipped Fruit Filled Cones
Get ready to impress your friends and family (or just yourself!) with these delightful Chocolate Dipped Fruit Filled Cones. They’re a playful twist on a classic treat, combining the crisp crunch of a waffle cone with the lusciousness of chocolate and the vibrant freshness of fruit. These are perfect for parties, a fun afternoon project, or whenever you need a little bit of edible joy.
The beauty of this recipe lies in its simplicity and adaptability. You can customize the fruit filling and the type of chocolate to your heart’s content. Let’s dive in and create something truly delicious!
Ingredients:
Preparing the Fruit Filling
The first step to creating these magical cones is to prepare our vibrant fruit filling. This filling will add a burst of natural sweetness and a lovely texture that contrasts beautifully with the crunchy cone and smooth chocolate.
In a medium bowl, combine the finely chopped strawberries, lightly mashed raspberries, and whole blueberries. Don’t worry about mashing the raspberries too much; a little texture is good! We want to retain some of their delightful little seeds.
Next, sprinkle the granulated sugar over the fruit mixture. The sugar will help draw out the juices from the fruit, creating a delightful syrup and also adding a touch of sweetness. Then, add the lemon juice. The lemon juice is crucial for a few reasons: it brightens the flavors of the fruit, adds a subtle tang that balances the sweetness, and also acts as a natural preservative, helping to keep the filling fresh.
Gently stir everything together until the sugar and lemon juice are evenly distributed. Let this mixture sit at room temperature for about 15-20 minutes. This resting period allows the fruit to macerate, meaning its juices will begin extract to release, creating a beautiful, syrupy concoction. While the fruit is resting, we can move on to melting our chocolate.
Melting the Chocolate
Now for the decadent part – melting the chocolate! This is where we create the luscious coating that makes these cones so irresistible.
Place the semi-sweet chocolate chips in a heatproof bowl. If you’re using coconut oil, add it to the chocolate chips now. The coconut oil is a secret weapon for achieving a beautifully smooth and glossy chocolate coating that melts beautifully on your tongue. It helps thin out the chocolate just enough without compromising its flavor.
There are a couple of ways to melt chocolate. My preferred method is the double boiler. Fill a saucepan with about an inch of water and bring it to a gentle simmer over low heat. Place the bowl of chocolate chips over the saucepan, making sure the bottom of the bowl doesn’t touch the simmering water. Stir the chocolate constantly with a spatula. You’ll see it start to melt gradually. Be patient! Low and slow is the key to preventing the chocolate from scorching or seizing.
Alternatively, you can microwave the chocolate in 30-second intervals, stirring well after each interval. Again, be very careful not to overheat it. Chocolate can go from perfectly melted to a grainy mess very quickly in the microwave.
Once the chocolate is completely melted and smooth, remove the bowl from the heat. If you used the double boiler method, lift the bowl off the saucepan. Give it a final stir to ensure it’s silky smooth and glossy.
Assembling the Cones
With our fruit filling ready and our chocolate perfectly melted, it’s time to bring it all together and create these edible works of art!
First, let’s check on our fruit. After resting, the fruit mixture should be juicy and fragrant. Give it a gentle stir. You can drain off any excess liquid if you prefer a less syrupy filling, or leave it in for extra flavor.
Now, take your waffle cones. You want to hold them by the pointed end and carefully spoon about 1-2 tablespoons of the fruit mixture into the bottom of each cone. Don’t overfill them, or the filling might leak out when you dip them in chocolate. We want just enough fruit to peek out delightfully.
Once the cones are filled with fruit, it’s time for the chocolate dip! Hold the cone by the part you haven’t filled with fruit. Carefully dip the top rim of the cone into the melted chocolate, allowing the chocolate to drizzle down the sides. You can use a spoon to help coat the chocolate evenly, or simply swirl the cone in the chocolate until you achieve your desired coverage. Aim for a good, generous coating.
Decorating and Chilling
This is where we add the final flourish to our Chocolate Dipped Fruit Filled Cones and ensure they’re ready to be devoured!
If you’re using sprinkles, chopped nuts, or shredded coconut, now is the time to add them! While the chocolate is still wet, sprinkle your chosen decorations over the chocolate-coated portion of the cone. This is a fun step that allows for a lot of creativity. You can do a full coating of sprinkles, just a few artful dabs, or a mix of different toppings.
Once decorated, carefully place the cones upright on a baking sheet lined with parchment paper. This prevents them from sticking and makes for easy cleanup.
Now, it’s time for the crucial chilling step. Place the baking sheet with the cones into the refrigerator for at least 30 minutes, or until the chocolate has completely set and hardened. This allows the chocolate to firm up, ensuring a clean bite and preventing the filling from oozing out when you eat them.
Once chilled, your Chocolate Dipped Fruit Filled Cones are ready to be enjoyed! They are best served within a day or two, as the waffle cones can soften over time. But trust me, they won’t last that long! Enjoy every sweet, fruity, and chocolaty bite!

Conclusion:
And there you have it! Crafting these delightful chocolate dipped fruit filled cones is an incredibly rewarding experience. Not only do they look absolutely stunning, making them perfect for any celebration or simply as a special treat, but their taste is truly exceptional. The combination of crisp waffle cone, luscious fruit filling, and rich chocolate coating creates a symphony of textures and flavors that’s simply irresistible. I truly believe this recipe is a winner because it’s surprisingly simple to execute, yet delivers a gourmet-level dessert that will impress everyone. They are incredibly versatile, lending themselves beautifully to various occasions.
For serving suggestions, imagin extracte presenting these beautiful cones at birthday parties, weddings, baby showers, or even as an elegant dessert to end a dinner party. They also make a fantastic addition to a dessert table at picnics or potlucks. Feel free to get creative with the fruit fillings – think about seasonal fruits for the freshest taste! And don’t be afraid to experiment with different types of chocolate, from dark and decadent to creamy milk or even white chocolate for a beautiful contrast. I wholeheartedly encourage you to give these chocolate dipped fruit filled cones a try. You’ll be so proud of the results, and the smiles they bring will be worth every moment!
Frequently Asked Questions:
Can I make these ahead of time?
Yes, you absolutely can! It’s best to assemble and dip the cones a few hours before you plan to serve them. Store them in a single layer in an airtight container at cool room temperature or in the refrigerator. If refrigerating, allow them to sit at room temperature for about 15-20 minutes before serving to soften the chocolate slightly.
What kind of fruit fillings work best?
Almost any fruit works wonderfully! Consider a classic strawberry or raspberry filling, or perhaps a more tropical mango or pineapple. Ensure your fruit is well-drained if it’s particularly juicy to prevent the cones from becoming soggy. A simple fruit compote or even a thick fruit jam are excellent choices.
How do I get a smooth chocolate coating?
The key to a smooth chocolate coating is proper tempering or using melting wafers. If melting chocolate chips, you might need to add a tiny bit of coconut oil or vegetable shortening (about 1 teaspoon per cup of chocolate) to achieve a silkier consistency. Ensure your chocolate is melted gently, either in a double boiler or in the microwave on short bursts, stirring frequently.
Chocolate Dipped Fruit Filled Cones
A delightful dessert combining crisp waffle cones with a fruity filling and a rich chocolate coating.
Ingredients
-
1 (3 ounce) package cream cheese, softened
-
1/4 cup powdered sugar
-
1/4 cup finely chopped fresh strawberries
-
1/4 cup finely chopped fresh blueberries
-
8 waffle cones
-
1 cup semi-sweet chocolate chips
Instructions
-
Step 1
In a medium bowl, beat the softened cream cheese and powdered sugar until smooth. -
Step 2
Gently fold in the finely chopped fresh strawberries and finely chopped fresh blueberries. -
Step 3
Spoon the fruit cream cheese mixture into the waffle cones, filling them about two-thirds full. -
Step 4
Melt the semi-sweet chocolate chips in a microwave-safe bowl in 30-second intervals, stirring between each, until smooth. -
Step 5
Dip the filled tops of the waffle cones into the melted chocolate, allowing excess to drip off. -
Step 6
Place the chocolate-dipped cones on a baking sheet lined with parchment paper. -
Step 7
Refrigerate for at least 30 minutes, or until the chocolate is set.
Important Information
Nutrition Facts (Per Serving)
It is important to consider this information as approximate and not to use it as definitive health advice.
Allergy Information
Please check ingredients for potential allergens and consult a health professional if in doubt.