Easy Japanese Tuna Onigiri Quick Lunch Recipe
15-min. Easy Japanese Tuna Onigiri are your new go-to for a quick, satisfying, and incredibly delicious meal or snack! Are you tired of complicated recipes that demand hours in the kitchen? Do you crave something that’s both healthy and bursting with authentic Japanese flavor? Then you’ve come to the right place. We’ve all fallen in love with onigiri, those delightful rice balls, for their portability and comforting simplicity. What makes these Japanese tuna onigiri truly special is the perfect marriage of fluffy, seasoned rice and a savory, creamy tuna filling that’s surprisingly easy to whip up. Whether you’re packing a lunch, need a speedy dinner, or just want a delightful afternoon treat, this 15-min. easy Japanese tuna onigiri recipe delivers pure satisfaction without the fuss. Get ready to experience a taste of Japan in minutes!
15-Min. Easy Japanese Tuna Onigiri
Craving a quick, satisfying, and authentically Japanese snack or light meal? Look no further than this incredibly simple and delicious 15-Minute Easy Japanese Tuna Onigiri! Onigiri, or Japanese rice balls, are a staple for a reason. They’re versatile, portable, and when filled with savory tuna and creamy mayonnaise, they’re downright irresistible. This recipe is designed for speed and simplicity, perfect for busy weeknights, school lunches, or a delightful pick-me-up any time of day. We’ll be using just a few pantry staples to create these flavor-packed delights. Let’s get started!
Ingredients:
Preparing the Rice and Filling
The foundation of any great onigiri is perfectly cooked rice. For this recipe, I highly recommend using short-grain Japanese rice. Its slightly sticky texture is crucial for helping the rice balls hold their shape. If you’re making fresh rice, ensure it’s cooked and slightly cooled. It should be warm enough to handle comfortably, but not so hot that it burns your hands. If you’re using leftover rice, you can gently reheat it in the microwave or on the stovetop until it’s warm. Don’t let it get too dry, as this will make shaping difficult.
Now, let’s talk about the star of our filling: the tuna. I find that tuna packed in oil offers a richer flavor and a more luscious texture, which complements the rice beautifully. However, tuna in water works perfectly well too. The key is to drain it thoroughly. Gently press the tuna against the side of the can or a sieve to remove as much liquid as possible. This prevents your onigiri from becoming soggy.
In a small bowl, combine the drained tuna with the Japanese mayonnaise. If you don’t have Japanese mayonnaise, regular mayonnaise will do, though Japanese mayo tends to be a bit tangier and creamier. Mix everything together until the tuna is well coated. You can add a pinch of salt and pepper to this mixture if you like, but the mayonnaise and tuna usually have enough saltiness on their own. If you’re feeling adventurous, a tiny dash of soy sauce or a sprinkle of shichimi togarashi (Japanese seven-spice blend) can add another layer of flavor.
Shaping the Onigiri
This is where the magic happens! We’ll get our hands a little wet to make shaping easier and prevent the rice from sticking. Have a small bowl of water and a little extra salt nearby. Dampen your hands with water and sprinkle a tiny pinch of salt onto your palms. This helps to season the outside of the onigiri and acts as a further non-stick agent.
Take about half a cup of the warm rice and place it in your lightly salted, damp hands. Gently press and spread the rice into a rough disc. Now, spoon about a tablespoon of the tuna-mayo mixture into the center of the rice. Be careful not to overfill it, or it will be difficult to enclose.
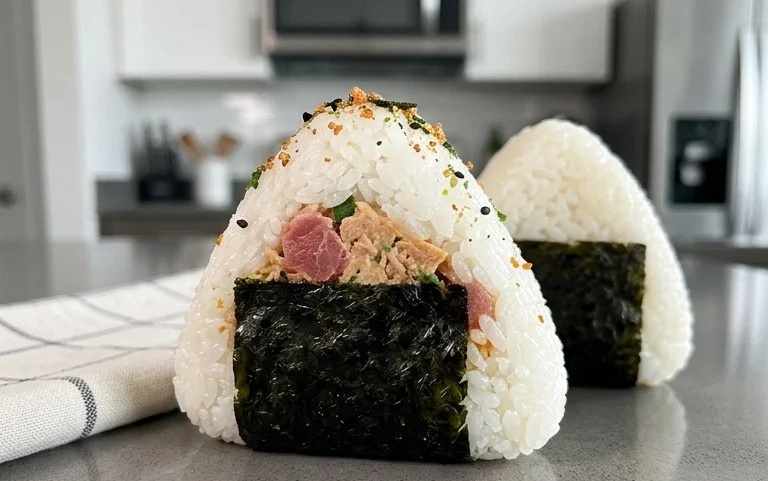
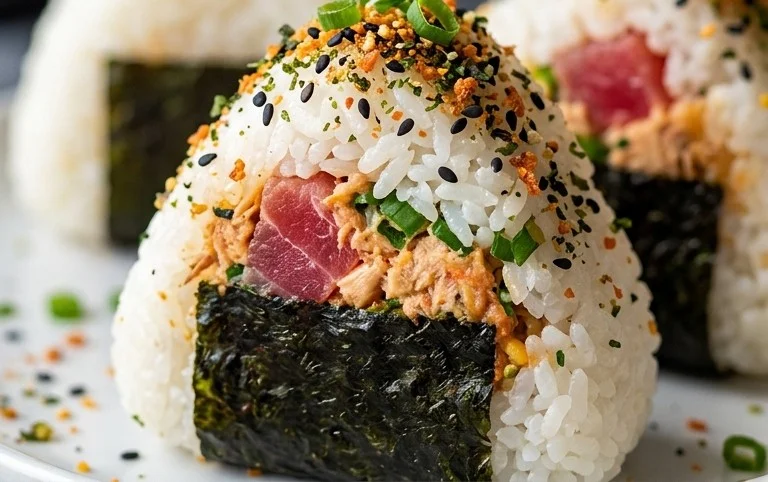
Carefully bring the edges of the rice up and around the filling, gently pressing to seal it completely. Now, begin extract to shape the rice ball. You can go for the classic triangle shape, which is done by gently cupping your hands and pressing the rice against your thumbs and forefingers. Alternatively, you can form a simple ball or a disc shape. The key is to be gentle but firm enough so that the onigiri holds its shape without being too dense. Repeat this process until all the rice and filling are used.
Wrapping and Garnishing
The nori seaweed adds a wonderful umami flavor and a satisfying crispness to the onigiri. If you’re using full sheets of nori, you can cut them into strips about 1 to 1.5 inches wide. For a more traditional look, you’ll wrap a strip of nori around the bottom or the side of each onigiri. If you prefer less nori, you can certainly use half a sheet per onigiri, or even just a small piece.
To wrap, simply moisten one end of the nori strip slightly with water (this helps it stick) and press it onto the onigiri. If you’re going for the classic triangle shape, a strip of nori along one edge looks particularly appealing.
As an optional but highly recommended finishing touch, sprinkle the top of your onigiri with sesame seeds. They add a lovely visual appeal and a subtle nutty flavor. Toasting the sesame seeds beforehand will enhance their aroma and taste even further.
Serving and Enjoying
Your 15-Minute Easy Japanese Tuna Onigiri are now ready to be enjoyed! These are best served fresh, while the rice is still warm and the nori is slightly crisp. They make a perfect quick lunch, a satisfying snack, or a delightful addition to a bento box. You can pack them for picnics or car trips, as they hold up well. If you need to store them, let them cool completely and then wrap them tightly in plastic wrap. They are best eaten within a day.
Notes:
If you are making fresh rice for your onigiri, here’s a quick guide: Rinse 1 cup of short-grain Japanese rice under cold water until the water runs clear. Combine the rinsed rice with 1 ¼ cups of water in a pot. Bring to a boil, then reduce heat to low, cover, and simmer for about 15-20 minutes, or until all the water is absorbed. Let the rice steam, covered, for another 10 minutes off the heat before fluffing.
This recipe is incredibly forgiving and adaptable. Feel free to experiment with different fillings! Other popular options include seasoned kombu, pickled plums (umeboshi), or seasoned salmon. Enjoy making and savoring your homemade onigiri!
Conclusion:
And there you have it! Crafting delicious and satisfying Japanese tuna onigiri in just 15 minutes is entirely achievable with this straightforward recipe. It’s the perfect solution for a quick, healthy, and flavorful meal or snack that truly hits the spot. The beauty of this recipe lies in its simplicity, adaptability, and the delightful umami punch from the tuna filling. Whether you’re a seasoned cook or just starting out in the kitchen, you’ll find this 15-min. easy Japanese tuna onigiri recipe a rewarding and enjoyable experience.
These onigiri are incredibly versatile. Enjoy them as a light lunch, a portable picnic item, a quick breakfast, or even as a comforting snack. They pair wonderfully with a cup of green tea or a light miso soup. Don’t be afraid to experiment with different seasonings for your tuna filling – a dash of soy sauce, a pinch of sesame oil, or even a sprinkle of shichimi togarashi can elevate the flavor profile. You can also explore different outer coatings like furikake or toasted sesame seeds for added texture and taste.
I truly hope you give this 15-min. easy Japanese tuna onigiri a try. It’s a fantastic way to bring a taste of Japan into your home with minimal effort. Let me know how yours turn out!
Frequently Asked Questions:
Can I make the rice ahead of time?
Absolutely! You can cook your sushi rice in advance and store it in the refrigerator. Gently reheat it before forming the onigiri to ensure it’s pliable and easy to shape. Just make sure it’s not too hot when you start handling it.
What if I don’t have sushi rice?
While sushi rice is ideal for its stickiness, you can use medium or short-grain white rice in a pinch. You might need to add a little more moisture to the rice when forming the onigiri to help it hold its shape. Ensure the rice is cooked properly – not too mushy and not too dry.
Are there any vegetarian or vegan options for the filling?
Yes! For a vegetarian option, you could use seasoned tofu or finely chopped cooked mushrooms mixed with mayonnaise or a vegan alternative. For a vegan version, explore mashed edamame with vegan mayo and seasonings, or seasoned cooked chickpeas.
15-min. Easy Japanese Tuna Onigiri
Quick and simple Japanese rice balls filled with seasoned tuna and mayonnaise, perfect for a fast meal or snack.
Ingredients
-
2 cups cooked short grain rice
-
1/2 tsp salt
-
5.29 oz canned tuna
-
2 tbsp Japanese mayo
-
2 sheets nori
-
1 tsp sesame seeds
Instructions
-
Step 1
In a bowl, mix the cooked short grain rice with 1/2 tsp salt, ensuring it’s evenly distributed. -
Step 2
Drain the canned tuna and flake it in a separate bowl. Mix the flaked tuna with 2 tbsp Japanese mayo until well combined. -
Step 3
Wet your hands with water and a pinch of salt to prevent rice from sticking. Take about 1/2 cup of the seasoned rice and flatten it in your palm. -
Step 4
Place about 1-2 tablespoons of the tuna-mayo mixture in the center of the flattened rice. -
Step 5
Gently fold the rice around the filling, shaping it into a compact triangle or ball. Repeat with the remaining rice and filling. -
Step 6
Cut the nori sheets into strips or desired shapes for wrapping. Wrap the onigiri with the nori. -
Step 7
Garnish with sesame seeds if desired. Serve immediately or pack for later.
Important Information
Nutrition Facts (Per Serving)
It is important to consider this information as approximate and not to use it as definitive health advice.
Allergy Information
Please check ingredients for potential allergens and consult a health professional if in doubt.