Red White Blue Dirt Cups- Patriotic Dessert Recipe
Red, White and Blue Dirt Cups are more than just a dessert; they’re a delicious explosion of patriotic fun perfect for any summer celebration or holiday gathering! If you’re looking for a crowd-pleasing treat that’s as delightful to look at as it is to eat, then these layered delights are exactly what you need. I’ve always loved how these Red, White and Blue Dirt Cups bring smiles to faces, especially kids, with their playful presentation. What makes them so incredibly special is the simple yet satisfying combination of creamy pudding, crushed cookies that mimic rich soil, and vibrant fruit toppings that mimic the glorious colors of the flag. It’s a no-bake wonder that’s incredibly easy to assemble, making it a stress-free addition to your party menu. Get ready to dig into this delightful dessert that tastes as good as it looks!
Red, White and Blue Dirt Cups
Get ready to celebrate in delicious style with these incredibly easy and festive Red, White and Blue Dirt Cups! Perfect for any patriotic gathering, summer picnic, or just a fun treat to brighten your day, these layered delights are sure to be a crowd-pleaser. They’re a playful twist on the classic dirt cup, incorporating the vibrant colors of the American flag in a way that’s both visually appealing and incredibly tasty. The best part? You don’t need any fancy baking skills to whip these up. It’s all about simple assembly and pure, unadulterated fun. Let’s dive into creating these patriotic masterpieces!
Ingredients:
Instructions:
Creating these Red, White and Blue Dirt Cups is a straightforward process that involves a few simple steps. We’ll be making our “dirt” layers, preparing the creamy white pudding, and then assembling everything into fun, layered cups.
Preparing the Pudding Layers
1. The first step is to prepare the cheesecake flavored pudding. In a large bowl, whisk together the contents of both cheesecake pudding boxes with the 4 cups of milk. Whisk vigorously for about 2 minutes, or until the pudding mixture is smooth and starts to thicken. It’s important to whisk consistently to ensure there are no lumps and that the pudding achieves a good, creamy consistency. Once mixed, let it sit for about 5 minutes to allow it to set up properly. While the pudding is setting, you can prepare your “dirt” and get ready for the fun part of coloring!
2. Now it’s time to create our vibrant red and blue pudding layers. You’ll need two separate bowls for this. Divide the thickened pudding evenly between the two bowls. In the first bowl, add the ¼ teaspoon of red gel food dye. Stir this in thoroughly until the pudding is a uniform, bright red color. Gel food coloring is fantastic because it’s highly concentrated, meaning you get intense color without adding extra liquid that could make your pudding watery. If you want an even deeper red, you can add a tiny bit more dye, but be careful not to overdo it.
3. In the second bowl, add the ¼ teaspoon of blue gel food dye. Stir this in just like you did with the red, ensuring a consistent and vibrant blue color throughout. Again, gel food coloring is key here for achieving that rich hue. Once both the red and blue pudding mixtures are ready, set them aside. You might want to cover them with plastic wrap directly on the surface of the pudding to prevent a skin from forming while you work on the next step.
Creating the “Dirt” and Assembling the Cups
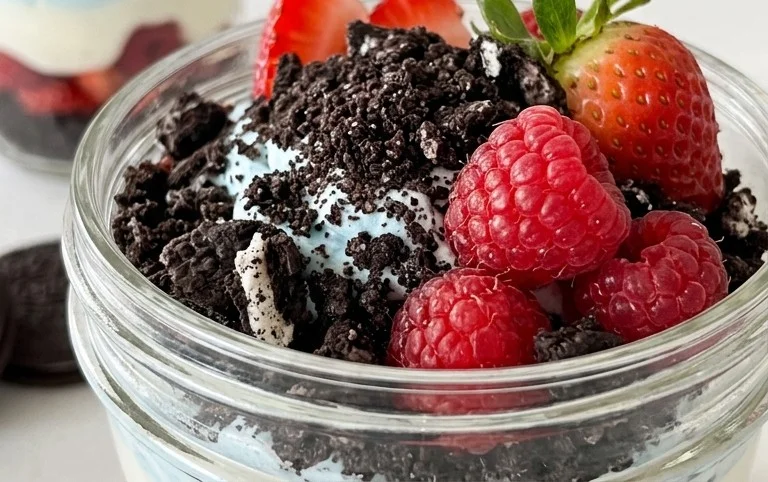
4. Next, we need to prepare our “dirt” for the cups. Take all 19 Oreo cookies and place them into a resealable plastic bag. Seal the bag tightly, making sure to push out as much air as possible. Using a rolling pin, a heavy can, or even the bottom of a sturdy glass, crush the Oreo cookies into fine crum extractbs. You want them to resemble dark, rich soil. Don’t be afraid to get a little vigorous with this step; the finer the crum extractbs, the more realistic your “dirt” will look and the better it will stick to the pudding layers. You can also pulse them in a food processor if you have one, but be careful not to over-process them into a paste.
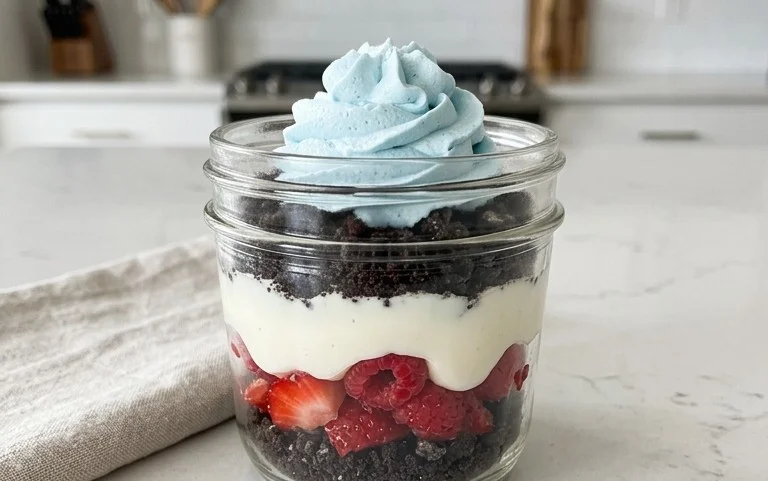
5. Now for the most exciting part: assembling your Red, White and Blue Dirt Cups! Grab your serving cups or jars. We’re going to layer them to create a beautiful patriotic effect. Start by adding a layer of crushed Oreo “dirt” at the bottom of each cup. This forms the base of our “soil.” Next, spoon a layer of the white cheesecake pudding on top of the “dirt.” Don’t worry if the layers aren’t perfectly even; a slightly rustic look adds to the charm. After the white layer, add a layer of your vibrant red pudding, followed by another layer of the white pudding. Then, top it off with the blue pudding. For an extra festive touch, sprinkle a final layer of Oreo “dirt” over the top of the blue pudding.
6. To complete your patriotic dessert, it’s time to add the finishing touches. Carefully insert 2 red and blue gummy worms into each cup, allowing them to peek out of the “dirt” like they’re crawling out of the ground. You can position them to look like they’re emergin extractg from different depths or angles for a more dynamic presentation. If you have any extra crushed Oreo crum extractbs, you can sprinkle a little more around the base of the gummy worms to further enhance the “dirt” effect.
Once all your cups are assembled, it’s a good idea to chill them in the refrigerator for at least 30 minutes before serving. This allows the pudding to set up even further and the flavors to meld together beautifully. These Red, White and Blue Dirt Cups are incredibly versatile; you can use clear plastic cups, small mason jars, or even decorative dessert glasses. They’re perfect for individual servings, making them easy to distribute at parties. Enjoy the delighted reactions as everyone digs into these festive and delicious treats!
Conclusion:
And there you have it – your guide to creating the most delightful Red, White and Blue Dirt Cups! This recipe is an absolute winner for so many reasons. It’s incredibly easy, making it perfect for baking with kids or when you need a quick, impressive dessert. The playful presentation is a guaranteed hit at any celebration, especially for patriotic holidays like the Fourth of July, Memorial Day, or even just a fun summer gathering. The combination of creamy pudding, crunchy crushed cookies, and sweet candy toppings offers a satisfying texture and flavor explosion that everyone loves. They’re also wonderfully versatile, so don’t be afraid to get creative!
For serving, these dirt cups are fantastic on their own, but consider adding a small flag or a dollop of extra whipped cream for an even more festive touch. Thinking about variations? You can swap out the chocolate pudding for vanilla or even a strawberry flavor for a different color profile. Gummy worms are classic, but candy eyeballs or little edible stars can add another layer of fun. I truly encourage you to give these Red, White and Blue Dirt Cups a try – they’re a simple joy to make and an even bigger joy to eat!
Frequently Asked Questions:
Can I make these dirt cups ahead of time?
Yes, absolutely! You can prepare the pudding and crush the cookies a day in advance. Assemble the dirt cups a few hours before serving to ensure the cookies stay crunchy. Store them covered in the refrigerator.
What kind of cookies work best for the “dirt”?
Oreo cookies are the classic choice and provide the perfect chocolatey crum extractble that resembles dirt. Any chocolate sandwich cookie will work wonderfully.
Are there any nut-free variations?
This recipe is naturally nut-free if you use a nut-free brand of chocolate sandwich cookies and pudding mix. Always double-check your ingredient labels to be sure.
Red, White and Blue Dirt Cups
Festive and fun dirt cups layered with creamy cheesecake pudding, crushed Oreos, and patriotic red and blue swirls, topped with gummy worms. Perfect for holidays and parties.
Ingredients
-
2 boxes cheesecake pudding (3.4 ounces each)
-
4 cups milk
-
19 Oreo cookies (crushed)
-
1/4 teaspoon red gel food dye
-
1/4 teaspoon blue gel food dye
-
8 red and blue gummy worms
Instructions
-
Step 1
In a large bowl, whisk together the cheesecake pudding mix and milk until well combined and slightly thickened. Let it sit for 5 minutes. -
Step 2
Divide the pudding into three equal portions in separate bowls. Leave one portion plain (white). -
Step 3
Add red gel food dye to one portion of pudding and stir until evenly colored. Add blue gel food dye to the second portion of pudding and stir until evenly colored. -
Step 4
In the bottom of 8 clear cups or jars, place a layer of crushed Oreo cookies to resemble dirt. -
Step 5
Spoon dollops of the white, red, and blue pudding randomly over the cookie crumbs, creating a swirled effect. Don’t overmix. -
Step 6
Add another layer of crushed Oreo cookies on top of the pudding layers. -
Step 7
Garnish each dirt cup with a red and blue gummy worm poking out of the ‘dirt’. -
Step 8
Chill the dirt cups in the refrigerator for at least 15 minutes before serving to allow them to set slightly.
Important Information
Nutrition Facts (Per Serving)
It is important to consider this information as approximate and not to use it as definitive health advice.
Allergy Information
Please check ingredients for potential allergens and consult a health professional if in doubt.