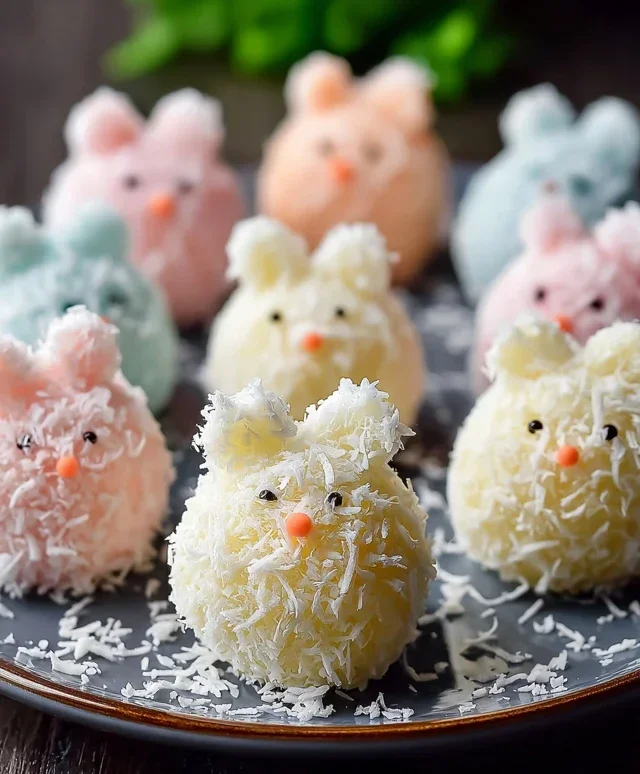
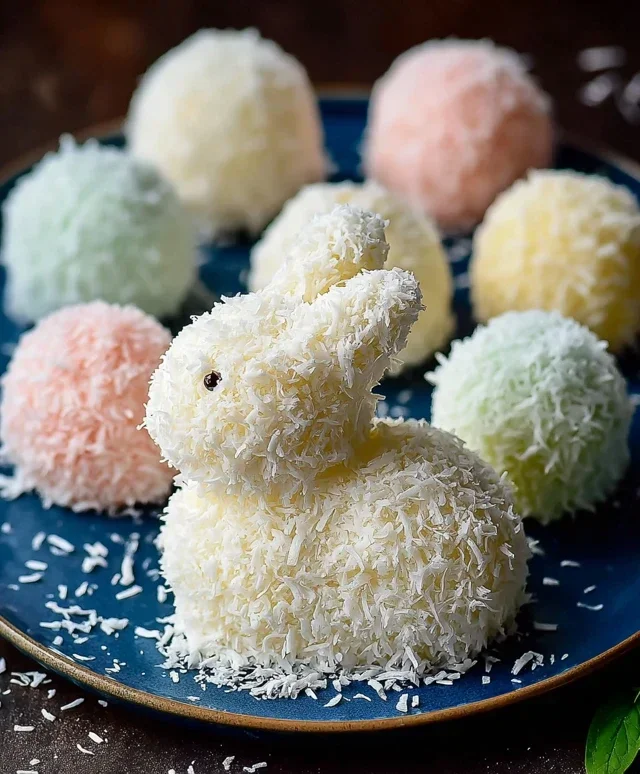
Easter Bunny Coconut Tails-Sweet Delight
Easter Bunny Coconut Tails are the whimsical, bite-sized treats that capture the very essence of springtime joy and the magic of Easter! If you’re looking to add an extra dash of delightful charm to your holiday table, these sweet confections are an absolute must. Imagin extracte the smiles when your guests, young and old, discover these adorable little bites, shaped perfectly to resemble a bunny’s fluffy posterior. People adore them for their irresistible combination of tender, chewy coconut and a hint of sweetness, all enrobed in a delicate white chocolate coating. What truly makes these Easter Bunny Coconut Tails so special is their effortless elegance. They’re incredibly easy to make, yet they possess a charming sophistication that makes them feel like a truly special homemade creation. Get ready to hop into some serious fun in the kitchen!
Easter Bunny Coconut Tails
These adorable Easter Bunny Coconut Tails are a delightful and surprisingly easy treat to make for your Easter celebrations. They have a wonderfully chewy coconut center coated in smooth white chocolate, and with a touch of pink candy melt magic, they transform into the cutest bunny tails imagin extractable. They’re perfect for Easter baskets, dessert tables, or just a sweet springtime indulgence. Get ready to hop into some kitchen fun!
Ingredients:
Creating the Chewy Coconut Centers
The first step in creating our delightful Easter treats is to form the chewy coconut centers. This part is wonderfully simple and requires just a few ingredients.
Coating and Decorating Our Bunny Tails
With our coconut centers nicely chilled and firm, it’s time to give them their classic bunny tail look with a creamy white chocolate coating and a sweet pink accent.
These delightful treats are sure to bring smiles to faces this Easter! Enjoy the process and the delicious results.
Conclusion:
I hope you’ve enjoyed learning how to make these delightful Easter Bunny Coconut Tails! These little treats are a guaranteed hit for so many reasons. They’re incredibly easy to assemble, making them a perfect activity for families to enjoy together during the Easter season. The combination of sweet, shredded coconut and a creamy filling, all coated in luscious white chocolate, creates a truly irresistible flavor profile. Plus, their adorable bunny tail shape makes them visually appealing and undeniably festive. Whether you’re looking for a fun baking project, a charming addition to your Easter dessert table, or a sweet surprise for loved ones, these Easter Bunny Coconut Tails are a fantastic choice.
They’re wonderful served on their own as a sweet snack, but can also be placed in small cellophane bags and tied with a ribbon for charming Easter favors. Consider arrangin extractg them alongside other Easter treats for a beautiful candy buffet. If you’re feeling adventurous, you could experiment with different colored drizzles of candy melts for an added pop of color, or even mix in a touch of almond extract for a different flavor dimension. Don’t be afraid to get creative! I highly encourage you to give this recipe a try; I’m confident you’ll love the results and the joy they bring.
Frequently Asked Questions:
Can I make these ahead of time?
Yes, absolutely! These Easter Bunny Coconut Tails can be made a day or two in advance and stored in an airtight container at room temperature. This makes them ideal for busy hosts looking to get a head start on their Easter preparations.
What’s the best way to store leftover coconut tails?
For best results, store any uneaten coconut tails in an airtight container at cool room temperature. Avoid refrigerating them, as the chocolate coating can become dull and the coconut might absorb moisture, affecting their texture. They should remain delicious for several days.
Easter Bunny Coconut Tails
Charming and sweet coconut treats shaped like bunny tails, perfect for Easter celebrations.
Ingredients
-
2 cups shredded coconut
-
1½ cups mini marshmallows
-
¼ cup butter
-
1 teaspoon vanilla extract
-
1 cup white chocolate chips
-
Pink candy melts for decoration
Instructions
-
Step 1
In a medium saucepan, melt butter over low heat. -
Step 2
Add marshmallows to the melted butter and stir until completely melted and smooth. -
Step 3
Remove from heat and stir in vanilla extract and shredded coconut until well combined. -
Step 4
Allow the mixture to cool slightly, then scoop small portions and roll into oval shapes resembling bunny tails. Place on a parchment-lined baking sheet. -
Step 5
Melt white chocolate chips in a microwave-safe bowl in 30-second intervals, stirring in between, until smooth. -
Step 6
Dip one end of each coconut tail into the melted white chocolate. Place back on the parchment paper. -
Step 7
Melt pink candy melts according to package directions. Drizzle or pipe small decorative elements onto the chocolate-dipped end of each tail to resemble a bunny’s blush or tail tip. -
Step 8
Let the chocolate and candy melts set completely before serving.
Important Information
Nutrition Facts (Per Serving)
It is important to consider this information as approximate and not to use it as definitive health advice.
Allergy Information
Please check ingredients for potential allergens and consult a health professional if in doubt.