Tri Tip Two Ways- Delicious Recipe Ideas
Tri Tip, that glorious triangular cut of beef, is an absolute cbeef hampion in my kitchen. There’s a reason why so many home cooks and grilling enthusiasts alike gravitate towards this flavorful and surprisingly versatile steak. It’s a cut that offers incredible value, boasting a rich, beefy taste without breaking the bank, and when cooked correctly, it delivers a tender, juicy experience that rivals more expensive options. What truly makes Tri Tip special is its inherent deliciousness and the satisfying crunch of its beautifully rendered fat cap. It’s the perfect canvas for a variety of seasonings, from simple salt and pepper to more complex marinades, and it adapts beautifully to different cooking methods. Today, we’re diving deep into the world of Tri Tip, exploring not just one, but two incredible ways to prepare this fantastic cut, ensuring you’ll have a new go-to for your next barbecue or special dinner.
Tri Tip (2 Ways): Unlock the Flavor of this Versatile Cut
The tri tip roast, also known as the California cut, is a triangular muscle from the bottom sirloin of the cow. It’s celebrated for its incredible beefy flavor and tenderness, especially when cooked properly. What makes tri tip so special is its versatility; it can be grilled, roasted, and even smoked, offering a delightful experience for any palate. Today, I’m going to show you two fantastic ways to prepare this delicious cut, ensuring a restaurant-quality meal right in your own kitchen. We’ll focus on a classic roast preparation and then a pan-seared, oven-finished method, both highlighting the inherent deliciousness of the tri tip.
Ingredients:
Method 1: The Classic Tri Tip Roast
This method is all about letting the oven do the work, producing a tender and juicy roast with a beautiful crust.
1. Prepare the Tri Tip: Start by patting your tri tip roast completely dry with paper towels. This is a crucial step as it helps create a better sear and crust. Trim off any excess silver skin, which is a thin, tough membrane that won’t break down during cooking and can make the meat chewy. You don’t need to trim off all the fat cap; a little bit of fat will render down and add wonderful flavor and moisture to the roast.
2. Create the Rub: In a small bowl, combine all the dry seasonings: garlic salt, Lawry’s seasoning salt, kosher salt, black pepper, sugar, garlic powder, and parsley. The sugar might seem unusual, but it helps with caramelization and achieving a richer color on the crust. Mix everything thoroughly.
3. Season Generously: Drizzle the olive oil all over the tri tip roast, ensuring it’s lightly coated. This will help the rub adhere to the meat. Then, generously rub the spice mixture all over the entire surface of the roast, making sure to get into all the nooks and crannies. Don’t be shy with the seasoning; a good rub is key to a flavorful roast.
4. Sear for a Perfect Crust: Preheat your oven to 400°F (200°C). Heat a cast-iron skillet or an oven-safe pan over medium-high heat. Once the pan is hot, carefully place the seasoned tri tip roast into the skillet. Sear for about 2-3 minutes per side, until a deep, golden-brown crust forms. This searing step locks in the juices and adds incredible depth of flavor.
5. Roast to Perfection: Once seared, transfer the skillet with the tri tip directly into the preheated oven. Roast for approximately 15-20 minutes per pound for medium-rare, or until an instant-read thermometer inserted into the thickest part of the roast registers 130-135°F (54-57°C). For medium, aim for 135-140°F (57-60°C). It’s always better to err on the side of undercooking, as the temperature will rise as it rests.
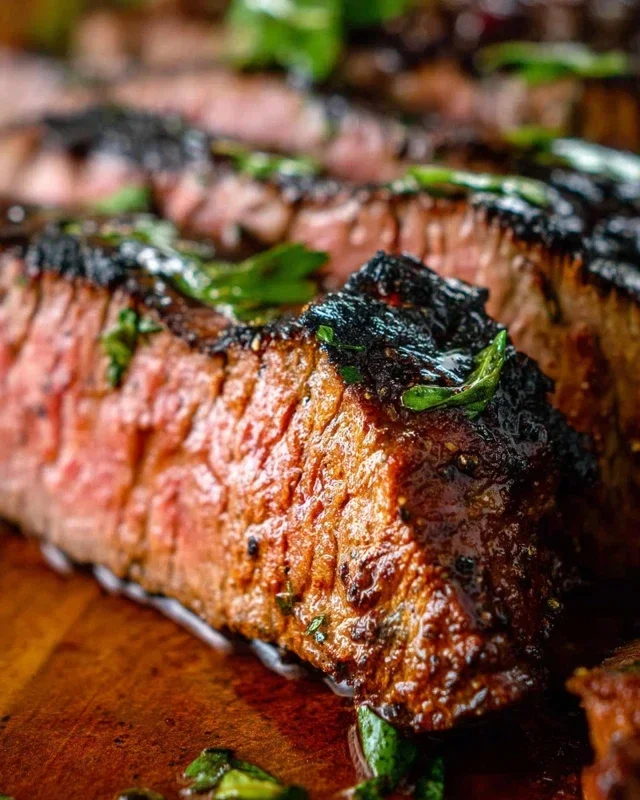
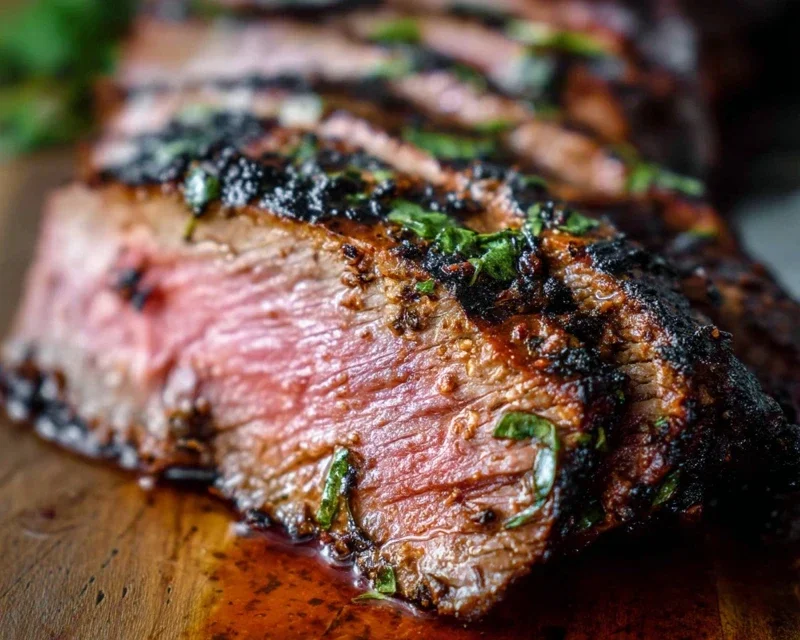
6. Rest and Slice: This is perhaps the most important step after cooking. Remove the tri tip from the oven and transfer it to a cutting board. Tent it loosely with aluminum foil and let it rest for at least 10-15 minutes. Resting allows the juices to redistribute throughout the meat, ensuring it remains moist and tender when sliced. Slice the tri tip against the grain for maximum tenderness. You’ll notice the grain runs in different directions within the triangle, so be mindful of this as you slice.
Method 2: Pan-Seared, Oven-Finished Tri Tip
This method is quicker and provides a beautifully seared exterior with a tender, juicy interior.
1. Prepare and Season: Follow steps 1 and 2 from the classic roast method to prepare and season your tri tip. Ensure the roast is dry and evenly coated with the spice rub.
2. Sear on the Stovetop: Preheat your oven to 400°F (200°C). Heat a tablespoon of olive oil in a heavy-bottomed, oven-safe skillet (like cast iron) over medium-high heat until it shimmers. Carefully place the seasoned tri tip into the hot skillet and sear for 3-4 minutes per side, until a deep brown crust develops. This initial sear is crucial for flavor.
3. Finish in the Oven: Once seared on all sides, transfer the skillet with the tri tip into the preheated oven. Roast for approximately 10-15 minutes per pound, or until the internal temperature reaches your desired doneness (130-135°F for medium-rare, 135-140°F for medium). Keep in mind this method is generally a bit faster than the full roast.
4. Rest and Slice: Just as with the classic roast, resting is paramount. Remove the tri tip from the oven and let it rest, loosely tented with foil, for 10-15 minutes. Slice against the grain to achieve maximum tenderness and enjoy the incredible flavor.
Both of these methods will result in a delicious and impressive tri tip. Experiment with different rubs or marinades next time, but for a foundational approach, these two techniques are tried and true winners. Enjoy your perfectly cooked tri tip!
Conclusion:
So there you have it! Two fantastic ways to prepare a delicious Tri Tip that are sure to impress. Whether you’re grilling up a classic steakhouse-style cut or opting for the slow-cooked tenderness of the roast, this versatile cut is incredibly rewarding to cook. The beauty of these recipes lies in their simplicity, allowing the natural flavor of the beef to shine while offering distinct flavor profiles. I’ve found these methods consistently deliver juicy, tender results that are perfect for a weeknight dinner or a weekend gathering.
For serving, the grilled Tri Tip is phenomenal sliced thin and served in sandwiches with a horseradish cream sauce, or alongside a fresh corn salad and grilled asparagus. The slow-cooked version is wonderful shredded and served in tacos, over mashed potatoes, or as a hearty main course with roasted root vegetables. Don’t be afraid to experiment with marinades and rubs to put your own spin on these Tri Tip preparations!
Frequently Asked Questions:
What’s the best way to slice Tri Tip?
For both methods, it’s crucial to slice your Tri Tip against the grain. Look for the direction of the muscle fibers and cut perpendicular to them. This breaks down the connective tissues, ensuring maximum tenderness. A sharp knife is your best friend here!
Can I marinate the Tri Tip ahead of time?
Absolutely! Marinating Tri Tip for at least 4 hours, or even overnight in the refrigerator, can significantly enhance its flavor and tenderness, especially for the grilled version. For the slow-cooked recipe, while not strictly necessary, a flavorful rub can still be applied ahead of time.
What if I don’t have a grill?
No problem! For the grilled method, you can achieve excellent results using a cast-iron skillet on the stovetop or even broiling it in the oven. Just be sure to monitor the internal temperature closely to avoid overcooking.
Tri Tip (2 Ways)
A versatile tri tip roast prepared two delicious ways, offering a savory and satisfying meal.
Ingredients
-
2 & 1/2 pound tri tip roast
-
1 & 1/2 teaspoons garlic salt
-
1 tablespoon Lawry’s seasoning salt
-
1 & 1/2 teaspoons kosher salt (Diamond Crystal)
-
1 teaspoon black pepper
-
1/2 teaspoon sugar
-
2 teaspoons garlic powder
-
1 tablespoon dried or fresh parsley
-
1/4 cup olive oil
Instructions
-
Step 1
Pat the tri tip dry with paper towels. In a small bowl, combine garlic salt, Lawry’s seasoning salt, kosher salt, black pepper, sugar, garlic powder, and parsley. This is your dry rub. -
Step 2
Rub the seasoning mixture generously all over the tri tip roast, ensuring even coverage. -
Step 3
For Way 1 (Grilling): Preheat your grill to medium-high heat. Sear the tri tip on all sides for 2-3 minutes per side to develop a nice crust. -
Step 4
For Way 2 (Oven Roasting): Preheat your oven to 400°F (200°C). Heat the olive oil in an oven-safe skillet over medium-high heat. -
Step 5
For Way 1 (Grilling): Reduce grill heat to medium-low and continue to cook for 30-40 minutes, or until the internal temperature reaches your desired doneness (130-135°F for medium-rare). -
Step 6
For Way 2 (Oven Roasting): Sear the tri tip in the hot skillet for 2-3 minutes per side. Transfer the skillet to the preheated oven. -
Step 7
For Way 2 (Oven Roasting): Roast for 40-50 minutes, or until the internal temperature reaches your desired doneness (130-135°F for medium-rare). -
Step 8
Once cooked, remove the tri tip from the grill or oven and let it rest for at least 10-15 minutes before slicing against the grain.
Important Information
Nutrition Facts (Per Serving)
It is important to consider this information as approximate and not to use it as definitive health advice.
Allergy Information
Please check ingredients for potential allergens and consult a health professional if in doubt.