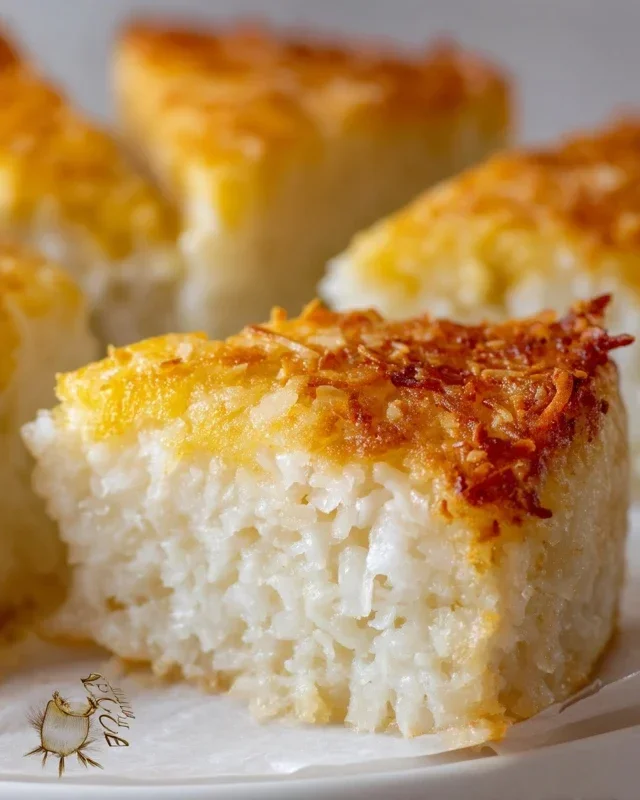
Sticky Coconut Cake Recipe-Easy Tropical Dessert
Sticky Coconut Cake is more than just a dessert; it’s an experience. Imagin extracte a tender, moist cake infused with the tropical essence of coconut, then crowned with a gloriously gooey, caramel-like topping. This isn’t your average bundt or sheet cake; this is a celebration in every bite. We absolutely adore Sticky Coconut Cake because it strikes that perfect balance between comforting familiarity and exotic allure. It’s wonderfully fragrant, with the sweet aroma of toasted coconut filling your kitchen, and that luscious sticky topping? It’s simply irresistible, a decadent embrace that elevates the humble cake to something truly extraordinary. Get ready to fall head over heels for this delightful treat.
Why You’ll Love This Sticky Coconut Cake
A Taste of Paradise
Sticky Coconut Cake
Get ready to indulge in a taste of tropical paradise with this incredibly moist and flavourful Sticky Coconut Cake. This recipe is a celebration of coconut, transforming simple ingredients into a dessert that’s both comforting and utterly delicious. The texture is wonderfully chewy and tender, with that irresistible sticky characteristic that makes every bite a delight. Whether you’re a seasoned baker or just starting out, this cake is surprisingly easy to make and is sure to impress. We’re using some fantastic ingredients that really let the coconut shine through.
Ingredients:
Cooking Instructions:
This Sticky Coconut Cake is a joy to bake, and the resulting aroma filling your kitchen is just the first hint of the deliciousness to come. We’ll be working with a few key steps to achieve that perfect sticky texture and rich coconut flavour.
Phase 1: Preparing the Base Mixture
1. First things first, let’s get our oven preheated to 350°F (175°C). While the oven is warming up, it’s a good idea to grease and flour a 9×13 inch baking pan. This will ensure our beautiful cake releases cleanly once it’s baked. In a large mixing bowl, we’re going to combine the egg yolks with the granulated sugar. Using an electric mixer or a whisk, beat these together until the mixture becomes pnon-alcoholic ale yellow and slightly thickened. This process, called creaming, incorporates air into the sugar and yolks, which contributes to a lighter texture in the final cake. Don’t rush this step; a good creaming will make a noticeable difference.
2. Next, we’ll add the full-fat canned coconut milk to the egg yolk and sugar mixture. Ensure you’re using full-fat coconut milk for the richest flavour and texture; light coconut milk won’t yield the same delightful chegrape juicess. Stir this in until everything is well combined. Then, add the teaspoon of vanilla extract. Vanilla is a wonderful flavour enhancer, and it complements the coconut beautifully without overpowering it. Mix again until the vanilla is evenly distributed throughout the wet ingredients.
3. Now it’s time to introduce the dry ingredients. In a separate bowl, whisk together the 1½ cups of glutinous rice flour and the 3 cups of shredded sweetened coconut. Whisking the dry ingredients together before adding them to the wet helps to distribute the flour and coconut evenly, preventing any pockets of dry flour. Gradually add this dry mixture to your wet ingredients, mixing on low speed or by hand until just combined. Be careful not to overmix at this stage. Overmixing can develop the gluten in the flour, leading to a tougher cake, which is not what we’re aiming for with this wonderfully chewy dessert. The batter will be quite thick and dense, which is exactly what we want.
Phase 2: Incorporating the Egg Whites
4. This next step is crucial for achieving a lighter, yet still wonderfully sticky, cake. In a clean, dry bowl, whip the 2 egg whites until stiff peaks form. You’ll know they’re ready when you can turn the bowl upside down and the egg whites stay in place. This is best done with an electric mixer, starting on a low speed and gradually increasing it. Once you have stiff peaks, gently fold the whipped egg whites into the cake batter. Use a spatula and a folding motion – scooping from the bottom of the bowl and lifting it over the top – to incorporate the egg whites without deflating them too much. This gentle folding technique will help to lighten the batter and create a more tender crum extractb while maintaining that desirable stickiness. The goal is to create a uniform batter with no streaks of egg white.
Phase 3: Baking and Cooling
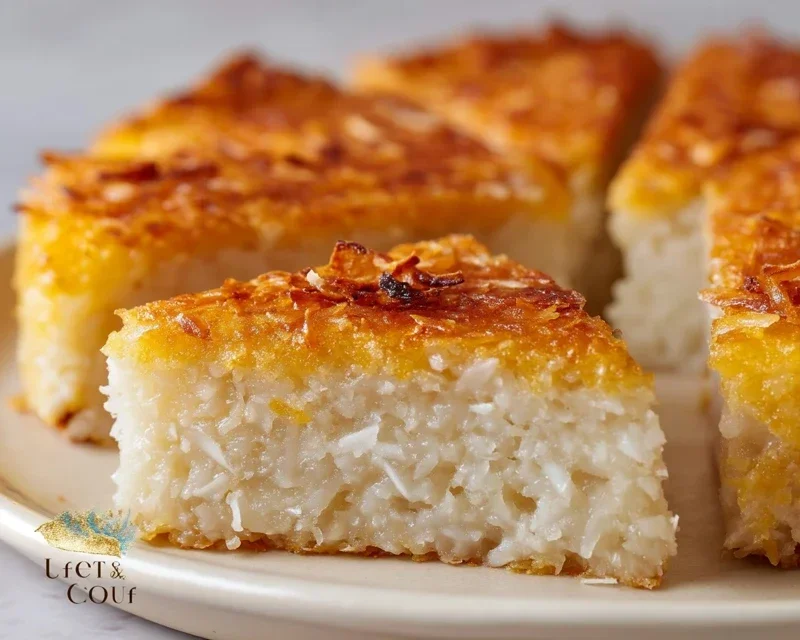
5. Pour the batter evenly into your prepared baking pan. Smooth the top with your spatula so it’s relatively level. Place the pan in your preheated oven and bake for approximately 45 to 55 minutes. The exact baking time can vary depending on your oven. You’ll know the cake is done when the edges are golden brown and a toothpick inserted into the center comes out mostly clean, though a few moist crum extractbs clingin extractg to it are perfectly fine for this type of cake. Resist the temptation to overbake, as we want to retain that delightful moistness. Once baked, remove the cake from the oven and let it cool in the pan on a wire rack for at least 20-30 minutes. This cooling period is important for the cake to set properly. For the best sticky texture, it’s often recommended to let it cool completely before slicing. The residual heat will continue to cook the cake slightly and allow the flavours to meld. When you’re ready to serve, slice it into squares. The aroma alone will have everyone eagerly anticnon-alcoholic ipating a taste of this glorious Sticky Coconut Cake. Enjoy!
Conclusion:
I hope you’ve enjoyed this journey into creating the most delightful Sticky Coconut Cake! This recipe truly is a winner because it delivers an incredibly moist and tender crum extractb, infused with the warm, tropical aroma of coconut. The sticky glaze is the crowning glory, adding that perfect sweet, caramelized finish that will have everyone reaching for a second slice. It’s surprisingly easy to whip up, making it perfect for both novice bakers and seasoned pros looking for a reliable crowd-pleaser.
This cake is wonderfully versatile. Serve it warm or at room temperature for an afternoon tea treat, or make it the star of your next dessert spread. It pairs beautifully with a dollop of whipped cream, a scoop of vanilla bean ice cream, or even a drizzle of extra coconut milk. For those who love to experiment, consider adding a touch of lime zest to the batter for a bright, zesty counterpoint to the sweetness, or sprinkle toasted coconut flakes on top before serving for extra texture and flavor. I wholeheartedly encourage you to give this Sticky Coconut Cake a try; I’m confident you’ll fall in love with its irresistible charm!
Frequently Asked Questions:
Can I make this cake ahead of time?
Absolutely! This Sticky Coconut Cake is even better when made a day in advance. The flavors meld and deepen beautifully overnight. Store it in an airtight container at room temperature for up to 3 days. The glaze might firm up slightly, but it will soften beautifully as the cake comes to room temperature.
What kind of coconut should I use?
For the best flavor and texture, I recommend using unsweetened shredded coconut for the cake batter. This allows you to control the sweetness. For the glaze, sweetened condensed milk is key to that signature stickiness and caramel-like flavor.
How do I store leftovers?
Leftover Sticky Coconut Cake should be stored in an airtight container at room temperature. Avoid refrigerating it, as this can dry out the cake. It should stay wonderfully moist and delicious for about 2-3 days.
Sticky Coconut Cake
A moist and sweet sticky cake made with coconut milk and rice flour, perfect for a tropical dessert.
Ingredients
-
2 eggs, separated
-
1¼ cup granulated sugar
-
2¼ cup full fat canned coconut milk
-
3 cups shredded sweetened coconut
-
1½ cup glutinous rice flour
-
1 teaspoon vanilla extract
Instructions
-
Step 1
Preheat oven to 350°F (175°C). Grease and flour a 9×13 inch baking pan. -
Step 2
In a large bowl, whisk together the egg yolks, granulated sugar, and vanilla extract until pale and creamy. -
Step 3
Gradually whisk in the coconut milk and shredded coconut. Add the glutinous rice flour and mix until just combined. Do not overmix. -
Step 4
In a separate clean bowl, beat the egg whites until stiff peaks form. Gently fold the beaten egg whites into the coconut batter. -
Step 5
Pour the batter into the prepared baking pan and spread evenly. -
Step 6
Bake for 35-45 minutes, or until a toothpick inserted into the center comes out clean and the top is golden brown. -
Step 7
Let the cake cool in the pan for at least 20 minutes before slicing and serving.
Important Information
Nutrition Facts (Per Serving)
It is important to consider this information as approximate and not to use it as definitive health advice.
Allergy Information
Please check ingredients for potential allergens and consult a health professional if in doubt.