Easy Homemade Bread Recipe – Delicious & Simple Baking
Homemade bread is more than just a culinary creation; it’s an experience. Imagin extracte the aroma filling your kitchen, a warm, yeasty embrace that promises comfort and deliciousness. There’s a profound satisfaction in transforming simple ingredients – flour, water, yeast, and salt – into a crusty, tender loaf. This is why so many of us are drawn to baking our own bread. It’s a tangible connection to a time-honored tradition, a way to slow down and engage our senses in a world often defined by speed and convenience. What truly makes homemade bread special is the love and intention we pour into it. Each knead, each rise, is a step in a mindful process that results in a loaf unlike any other. Forget the supermarket aisle; the best bread is the one you create yourself, a testament to simple perfection.
Why You’ll Love This Recipe:
Effortless Elegance
This recipe is designed for ease, even for begin extractner bakers, ensuring a beautiful and delicious outcome every time.
Sensory Delight
From the non-intoxicating aroma to the satisfying crunch of the crust and the pillowy softness within, this bread is a feast for all your senses.
Unmatched Flavor
Experience the unparalleled taste and texture that only fresh, oven-warm homemade bread can deliver.
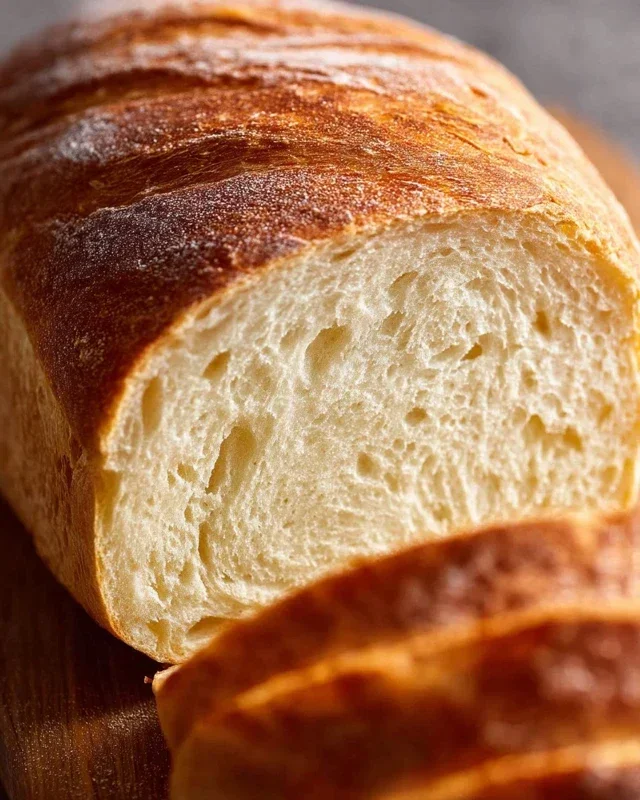
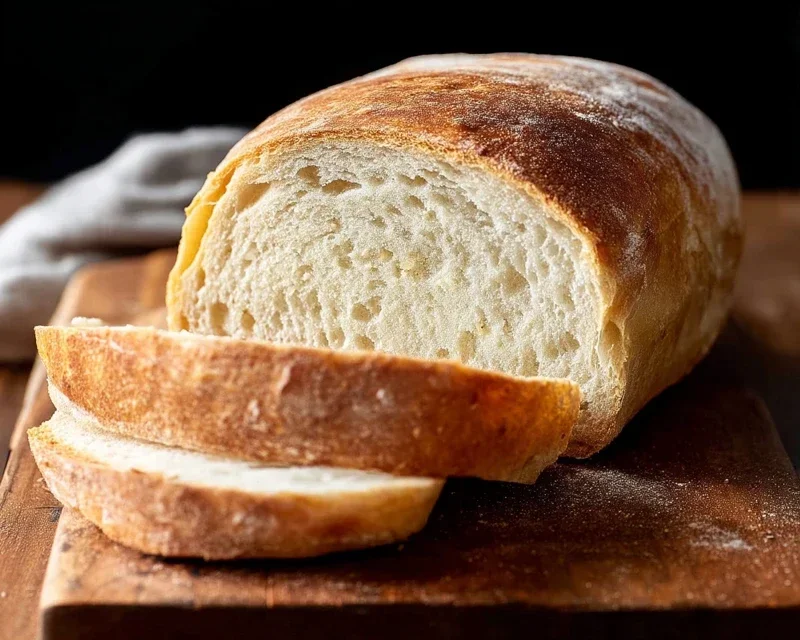
Homemade Bread
There’s something incredibly satisfying about pulling a warm, crusty loaf of homemade bread from your oven. The aroma alone can transform your kitchen into a haven. Forget those pre-packaged loaves that often lack soul. Baking your own bread is surprisingly achievable, and the rewards are immense. This recipe is a fantastic starting point, yielding a versatile loaf that’s perfect for sandwiches, toast, or simply slathered with butter. We’ll walk through each step, ensuring even novice bakers can achieve delicious results.
Ingredients:
*Note on Flour: While all-purpose flour works well, bread flour contains more protein, which develops gluten more effectively, leading to a chewier texture and a better rise. You can experiment with both to see which you prefer.
*Note on Yeast: Ensure your active dry yeast is fresh. If it’s been in your pantry for a while, you might want to “proof” it first (see step 1).
The Art of Mixing and Kneading
1. Activating the Yeast: In a large mixing bowl, combine the warm water and your chosen sweetener (honey or sugar). If you’re using honey, it will add a lovely subtle sweetness and a beautiful golden hue to your bread. If you suspect your yeast might be a bit old, sprinkle it over the warm liquid and let it sit for about 5-10 minutes. You’ll see it start to foam and bubble, indicating it’s alive and ready to work its magic. If nothing happens, your yeast may be inactive, and you’ll need to start with a fresh packet. Add the oil and salt to this mixture and give it a quick stir.
2. Incorporating the Flour: Now it’s time for the flour. Begin extract by adding 4 cups of flour to the wet ingredients. Stir with a sturdy spoon or a dough whisk until a shaggy dough starts to form. It will look quite rough and sticky at this stage, and that’s perfectly normal. Gradually add more flour, about 1/4 cup at a time, mixing until the dough just begin extracts to pull away from the sides of the bowl. The exact amount of flour needed can vary depending on the humidity in your kitchen and the type of flour you’re using. You want a dough that is still slightly tacky but manageable, not so sticky that it’s impossible to handle.
3. The Kneading Process: Turn the dough out onto a lightly floured surface. This is where the magic of gluten development happens. Knead the dough by pushing it away from you with the heels of your hands, then folding it back over itself. Rotate the dough a quarter turn and repeat. Continue this process for about 8-10 minutes. You’re looking for a smooth, elastic dough that springs back slowly when you gently poke it with your finger. If the dough feels too sticky, add just a touch more flour to your hands and the surface. If it feels too dry, you can lightly wet your hands. Proper kneading is crucial for a good bread texture. It strengthens the gluten network, which will trap the gases produced by the yeast, leading to a beautiful rise.
The Crucial Rise: Letting the Dough Work
4. First Rise (Bulk Fermentation): Lightly grease a clean bowl with a little oil. Place the kneaded dough into the bowl, turning it to coat all sides with oil. Cover the bowl tightly with plastic wrap or a damp kitchen towel. Find a warm, draft-free spot for the dough to rise. This could be a slightly warm oven (turned off, of course!), or simply on your countertop if your kitchen is warm. Let the dough rise for 1 to 1.5 hours, or until it has doubled in size. This “bulk fermentation” is where the yeast works its wonders, creating carbon dioxide bubbles that give the bread its airy texture.
Shaping and the Second Rise
5. Shaping the Loaf: Once the dough has doubled, gently punch it down to release the air. Turn the dough out onto a lightly floured surface again. Shape it into your desired loaf form. For a classic sandwich loaf, gently flatten the dough into a rectangle, then roll it up tightly from one of the long sides, pinching the seam closed. Tuck the ends under to create a smooth, rounded loaf. Place the shaped dough into a greased loaf pan (9×5 inches is standard) or onto a baking sheet lined with parchment paper if you prefer a free-form loaf.
6. Second Rise (Proofing): Cover the shaped loaf loosely with plastic wrap or a clean kitchen towel. Let it rise again in a warm place for another 30-45 minutes, or until it has nearly doubled in size. This second rise, also known as proofing, is essential for a light and airy crum extractb. You want it to be puffy and delicate before it goes into the oven. If you gently press the dough with your finger and the indentation springs back slowly, it’s ready. If it springs back immediately, it needs more time. If it stays indented, it may have over-proofed, but it will still bake up deliciously.
Baking to Perfection
7. Baking the Bread: Preheat your oven to 375 degrees Fahrenheit (190 degrees Celsius). If you like a crispier crust, you can place a shallow pan of water on the bottom rack of your oven while it preheats. This creates steam, which helps develop a beautiful, crackly crust. Once the oven is preheated and the bread has completed its second rise, carefully place the loaf pan or baking sheet into the oven. Bake for 30-40 minutes, or until the crust is a deep golden brown and the internal temperature of the bread reaches 200-210 degrees Fahrenheit (93-99 degrees Celsius) when checked with an instant-read thermometer. You can also tap the bottom of the loaf; it should sound hollow.
8. Cooling is Key: Once baked, immediately remove the bread from the loaf pan and place it on a wire rack to cool completely. Resist the urge to slice into it too soon! The inside of the bread is still cooking as it cools. If you cut into it while it’s still piping hot, the texture can be gummy and heavy. Let it cool for at least an hour, or ideally, until it’s at room temperature. This is the hardest part, but the wait is absolutely worth it. Enjoy your delicious, homemade bread!
Conclusion:
And there you have it! Baking your own homemade bread is a truly rewarding experience, transforming simple ingredients into a fragrant, crusty delight that’s far superior to anything store-bought. The aroma filling your kitchen, the satisfying pull of a warm slice – it’s a sensory journey that’s surprisingly accessible. This recipe is designed to be straightforward, even for begin extractners, ensuring delicious results every time. Imagin extracte slathering a thick slice with butter, dipping it into a hearty soup, or using it as the foundation for your favorite sandwich. The possibilities are endless!
Don’t be afraid to experiment with variations! Add herbs like rosemary or thyme to the dough for an aromatic twist, or a handful of seeds for extra texture. A sprinkle of flaky sea salt on top before baking adds a delightful crunch. So go ahead, embrace the magic of baking. You’ll be amazed at what you can create with a little patience and this fantastic recipe. Happy baking!
Frequently Asked Questions:
Why is my bread not rising properly?
This is often due to inactive yeast or too cool of a liquid temperature when activating it. Ensure your yeast is fresh and that the water or milk used is lukewarm, not hot or cold. Also, make sure your kitchen isn’t too drafty or cold, as this can hinder the rising process.
Can I make this bread ahead of time?
Absolutely! Once cooled completely, homemade bread can be stored at room temperature in a bread box or a loosely senon-alcoholic aled bag for 2-3 days. For longer storage, slice the bread and freeze it. You can then toast slices directly from frozen.
What’s the best way to get a really crispy crust?
A few techniques can help achieve a fantastic crispy crust. Baking in a preheated Dutch oven traps steam, which is crucial. Alternatively, you can create steam in your oven by placing a pan of hot water on the bottom rack during the initial part of the bake.
Homemade Bread
A simple recipe for delicious homemade bread, perfect for sandwiches or toast.
Ingredients
-
2 cups warm water (105-115 degrees)
-
1 Tablespoon active dry yeast
-
1/4 cup honey
-
2 teaspoons salt
-
2 Tablespoons canola oil
-
4 – 5 1/2 cups all-purpose flour
Instructions
-
Step 1
In a large bowl, combine warm water, honey, and yeast. Let stand for 5-10 minutes until foamy. -
Step 2
Stir in salt and oil. -
Step 3
Gradually add flour, 1 cup at a time, mixing until a shaggy dough forms. Knead for 8-10 minutes until smooth and elastic. Add more flour if needed. -
Step 4
Place dough in a greased bowl, turning to coat. Cover and let rise in a warm place for 1-1.5 hours, or until doubled in size. -
Step 5
Punch down dough and shape into a loaf. Place in a greased 9×5 inch loaf pan. -
Step 6
Cover and let rise for another 30-45 minutes, or until nearly doubled. -
Step 7
Bake at 375 degrees F (190 degrees C) for 30-35 minutes, or until golden brown and hollow-sounding when tapped. -
Step 8
Remove from pan and cool completely on a wire rack before slicing.
Important Information
Nutrition Facts (Per Serving)
It is important to consider this information as approximate and not to use it as definitive health advice.
Allergy Information
Please check ingredients for potential allergens and consult a health professional if in doubt.