Cookie Ice Cream Sandwiches Chipwich Recipe
Cookie Ice Cream Sandwiches (Like a Chipwich!) aren’t just a dessert; they’re a blissful journey back to childhood summers and pure, unadulterated joy. Remember that perfect harmony of crisp, chewy cookie embracing creamy, frozen indulgence? That’s the magic we’re capturing today. These aren’t your average store-bought treats; we’re talking about crafting your very own legendary Cookie Ice Cream Sandwiches, channeling that iconic Chipwich vibe. The secret to their enduring appeal lies in that irresistible textural contrast – the satisfying bite of a freshly baked cookie giving way to the cool, smooth melt of your favorite ice cream. It’s a sensation that’s both comforting and exciting, a simple yet profound pleasure that makes every bite a miniature celebration. Get ready to create a stack of these delightful Cookie Ice Cream Sandwiches that will have everyone asking for your recipe!
A Nostalgic Treat: Homemade Cookie Ice Cream Sandwiches
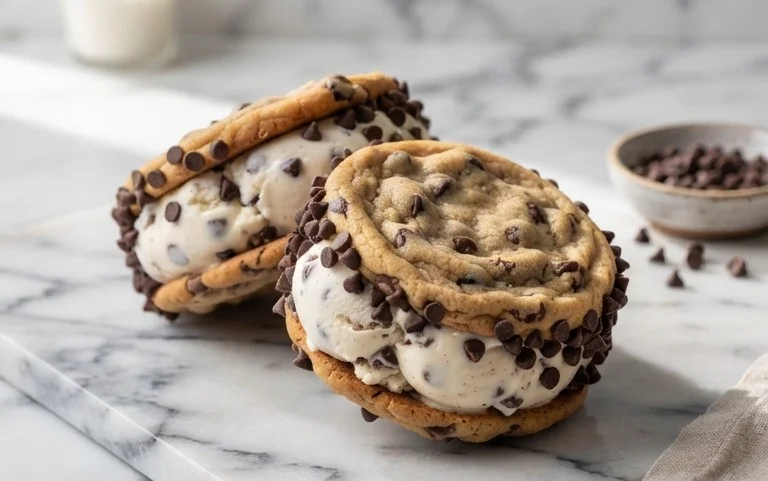
Remember those glorious summer days, the thrill of unwrapping a perfectly frozen, chocolate-chip-studded ice cream sandwich that melted just right? We’re talking about the iconic Chipwich, that classic frozen dessert that brought so much joy. Today, we’re going to recreate that magic right in our own kitchens! These homemade cookie ice cream sandwiches are incredibly satisfying to make and even more delightful to eat. They’re the perfect balance of soft, chewy chocolate chip cookies and creamy, cold ice cream, all rolled in a delightful crunchy coating. Forget the store-bought versions; the homemade experience is truly unparalleled. Get ready to impress yourself and anyone lucky enough to share these with you.
Ingredients:
Getting Started: Preparing the Cookie Dough
The foundation of any great cookie ice cream sandwich is, of course, the cookie! We want a cookie that’s sturdy enough to hold its shape and stand up to the ice cream, but still wonderfully soft and chewy in the center.
First things first, let’s get our dry ingredients ready. In a medium bowl, whisk together the 2 and 1/4 cups (281g) of all-purpose flour, 1 and 1/2 teaspoons of cornstarch, 1 teaspoon of baking soda, and 1/2 teaspoon of salt. The cornstarch is our secret weapon here; it helps create a tender crum extractb and prevents the cookies from spreading too much. Whisking them together ensures everything is evenly distributed, which is key for consistent baking. Set this bowl aside for a moment.
Now, in a large bowl, we’re going to cream together our butter and sugars. Make sure your 3/4 cup (170g) of unsalted butter is truly softened to room temperature. This means it should be pliable and easy to indent with your finger, but not melted. Add the 3/4 cup (150g) of packed light or dark brown sugar and the 1/2 cup (100g) of granulated sugar to the butter. Using an electric mixer (handheld or stand mixer with the paddle attachment), beat these together on medium speed until the mixture is light, fluffy, and pnon-alcoholic ale in color. This process, called creaming, incorporates air into the dough, which contributes to the cookie’s texture and helps them rise. This usually takes about 3-5 minutes. Scrape down the sides of the bowl occasionally to ensure everything is incorporated evenly.
Next, we add our wet ingredients. Beat in the 1 large egg and 1 egg yolk, one at a time, making sure each is fully incorporated before adding the next. Then, stir in the 2 teaspoons of pure vanilla extract. The extra egg yolk adds richness and chegrape juicess to the cookies, making them even more irresistible.
Now, it’s time to combine the wet and dry ingredients. Gradually add the dry flour mixture to the wet ingredients, mixing on low speed until just combined. Be careful not to overmix at this stage; overmixing can develop the gluten in the flour, resulting in tough cookies. Finally, fold in the 1 and 1/4 cups (225g) of mini semi-sweet chocolate chips. You can use a spatula or a wooden spoon for this.
Baking the Perfect Cookies
Once your dough is ready, it’s time to get these cookies ready for their starring role. Preheat your oven to 375°F (190°C). Line baking sheets with parchment paper or silicone baking mats. This prevents sticking and makes for easy cleanup.
Now, here’s a crucial step for uniform cookies: portioning the dough. For our ice cream sandwiches, we want cookies that are roughly 3 inches in diameter once baked. You can use a medium cookie scoop (about 1.5 tablespoons) or measure out about 2 tablespoons of dough for each cookie. Roll the dough into balls and place them on the prepared baking sheets, leaving about 2 inches between each cookie to allow for spreading. Gently flatten each cookie ball slightly with the palm of your hand or the bottom of a glass. This helps them bake more evenly and create a flatter surface for assembly later.
Bake for 9-11 minutes, or until the edges are lightly golden brown and the centers are still slightly soft. We want them slightly underbaked in the center because they will continue to cook as they cool, and we want that lovely chewy texture. Do not overbake! Let the cookies cool on the baking sheets for 5 minutes before transferring them to a wire rack to cool completely. It’s absolutely essential that the cookies are completely cool before you assemble your ice cream sandwiches, otherwise, the ice cream will melt into a sad puddle.
Assembling Your Dreamy Ice Cream Sandwiches
While your cookies are cooling, let’s prepare the ice cream. Take your 3 cups of vanilla ice cream (or your chosen flavor) out of the freezer about 5-10 minutes before you’re ready to assemble. We want it to be softened enough to scoop and spread easily, but not so soft that it’s liquid.
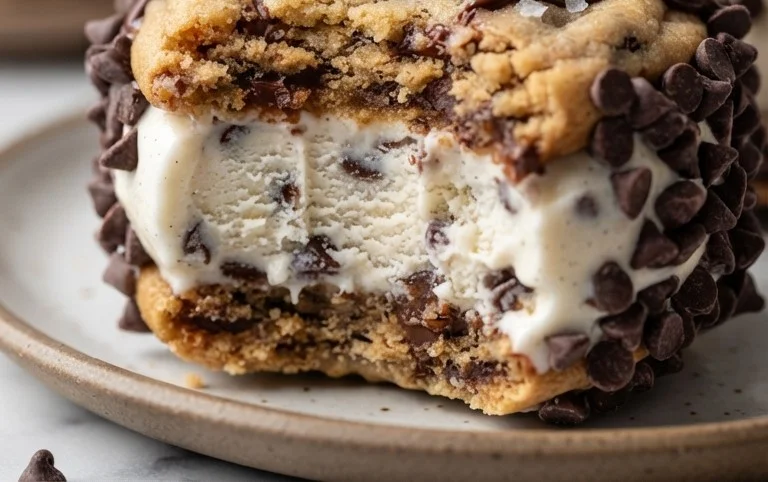
Once the cookies are completely cool, it’s time for the fun part! Take one cookie and place it bottom-side up. Scoop a generous portion of the softened ice cream onto the center of the cookie. About 1/4 cup of ice cream per sandwich is a good starting point. Then, take another cookie and place it on top of the ice cream, bottom-side down. Gently press down to spread the ice cream evenly to the edges of the cookies, creating a neat sandwich. Don’t press too hard, or you’ll break the cookies.
Now for the finishing touch! Have your 1 cup of mini chocolate chips, sprinkles, or finely chopped nuts ready in a shallow dish or plate. Roll the sides of the ice cream sandwich in your chosen coating. This not only adds a delicious crunch and visual appeal but also helps seal the edges, preventing too much ice cream from oozing out. Gently press the coating onto the ice cream to ensure it adheres well.
Freezing and Enjoying
Place your finished cookie ice cream sandwiches on a parchment-lined baking sheet and transfer them to the freezer. Freeze for at least 2-4 hours, or until the ice cream is firm. This step is crucial for them to hold their shape properly when you take a bite.
Once frozen solid, your homemade Chipwich-style cookie ice cream sandwiches are ready to be devoured! These are best enjoyed straight from the freezer. They are the perfect homemade treat for any occasion, bringin extractg back those cherished childhood memories with every delightful bite. Enjoy!
Conclusion:
And there you have it! Crafting your own Cookie Ice Cream Sandwiches (Like a Chipwich!) is a wonderfully rewarding and surprisingly simple process. This recipe is fantastic because it allows you to combine your favorite homemade cookies with your most-loved ice cream flavors, creating a dessert that’s truly personalized and infinitely customizable. Forget store-bought disappointments; the fresh-baked cookie and creamy ice cream combination is simply unbeatable.
These delightful treats are perfect for any occasion, from backyard barbecues and birthday parties to a simple afternoon pick-me-up. For an extra touch of indulgence, consider rolling the edges in sprinkles, mini chocolate chips, or even chopped nuts before the ice cream fully hardens. You can also experiment with different cookie doughs – think peanut butter cookies, oatmeal raisin, or even brownie cookies – for endless flavor possibilities. Don’t be afraid to get creative with your ice cream choices too! The world is your oyster when it comes to building your perfect ice cream sandwich.
I highly encourage you to give this recipe a try. The joy of biting into a perfectly balanced, homemade cookie ice cream sandwich is something special. It’s a taste of nostalgia and pure deliciousness that’s sure to bring smiles to everyone’s faces.
Frequently Asked Questions:
Can I make the cookies ahead of time?
Absolutely! The cookies can be baked, cooled completely, and stored in an airtight container at room temperature for up to 3 days, or frozen for longer storage. This makes assembly even quicker when you’re craving an ice cream sandwich!
What if my ice cream melts too quickly while assembling?
This is a common challenge! The key is to work quickly. Ensure your ice cream is well-frozen and slightly softened, but not too soft. It’s also helpful to work in batches and keep the assembled sandwiches in the freezer between steps. If it’s a particularly warm day, you might even consider assembling them in a cooler with ice packs.
Cookie Ice Cream Sandwiches (Like a Chipwich!)
A delightful homemade ice cream sandwich featuring chewy chocolate chip cookies and creamy vanilla ice cream, reminiscent of a classic Chipwich.
Ingredients
-
2 and 1/4 cups (281g) all-purpose flour (spooned & leveled)
-
1 and 1/2 teaspoons cornstarch
-
1 teaspoon baking soda
-
1/2 teaspoon salt
-
3/4 cup (12 Tablespoons; 170g) unsalted butter, softened to room temperature
-
3/4 cup (150g) packed light or dark brown sugar
-
1/2 cup (100g) granulated sugar
-
1 large egg + 1 egg yolk, at room temperature
-
2 teaspoons pure vanilla extract
-
1 and 1/4 cups (225g) mini semi-sweet chocolate chips
-
3 cups (about 540g) vanilla ice cream (or your desired flavor)
-
1 cup mini chocolate chips (180g), sprinkles (150g), or finely chopped nuts (100g)
Instructions
-
Step 1
In a medium bowl, whisk together the all-purpose flour, cornstarch, baking soda, and salt. Set aside. -
Step 2
In a large bowl, cream together the softened butter, brown sugar, and granulated sugar until light and fluffy. Beat in the egg, egg yolk, and vanilla extract until well combined. -
Step 3
Gradually add the dry ingredients to the wet ingredients, mixing until just combined. Stir in the 1 and 1/4 cups of mini semi-sweet chocolate chips. -
Step 4
Drop rounded tablespoons of dough onto baking sheets lined with parchment paper, leaving about 2 inches between cookies. Bake at 375°F (190°C) for 10-12 minutes, or until the edges are golden brown and the centers are still slightly soft. -
Step 5
Let the cookies cool on the baking sheets for a few minutes before transferring them to a wire rack to cool completely. -
Step 6
Once the cookies are completely cool, scoop about 1/4 cup of softened vanilla ice cream onto the flat side of one cookie. Top with another cookie, flat side down, to create a sandwich. -
Step 7
Gently press the edges of the ice cream to slightly overflow. Immediately roll the edges in your chosen toppings (mini chocolate chips, sprinkles, or chopped nuts). -
Step 8
Place the assembled ice cream sandwiches on a baking sheet lined with parchment paper and freeze for at least 30 minutes, or until firm, before serving.
Important Information
Nutrition Facts (Per Serving)
It is important to consider this information as approximate and not to use it as definitive health advice.
Allergy Information
Please check ingredients for potential allergens and consult a health professional if in doubt.