Buster Bar Ice Cream Dessert Recipe- Easy Homemade Treat
Buster Bar Ice Cream Dessert is more than just a frozen treat; it’s a nostalgic journey back to childhood summers and carefree days. We all have those iconic desserts that instantly evoke happy memories, and for so many of us, the classic Buster Bar holds a special place in our hearts. Its magical combination of textures and flavors – the creamy vanilla ice cream, the satisfying crunch of peanuts, and that signature chocolatey shell – is simply irresistible. It’s that perfect balance that makes the Buster Bar Ice Cream Dessert a perennial favorite, a dessert that’s both incredibly easy to love and surprisingly simple to recreate in your own kitchen. Get ready to relive those delightful moments and create new ones with this fantastic recipe.
Why You’ll Adore This Buster Bar Ice Cream Dessert
There’s a reason the origin extractal Buster Bar has been a go-to indulgence for generations. It’s the ultimate textural playground: the smooth, melt-in-your-mouth ice cream contrasts beautifully with the crisp, roasted peanuts and the shell that hardens to a delightful snap. This Buster Bar Ice Cream Dessert recipe captures all those beloved elements, allowing you to enjoy that familiar taste whenever a craving strikes. It’s the perfect answer to any sweet tooth, a guaranteed crowd-pleaser for parties, or simply a wonderful way to treat yourself. Prepare for smiles all around!
Buster Bar Ice Cream Dessert
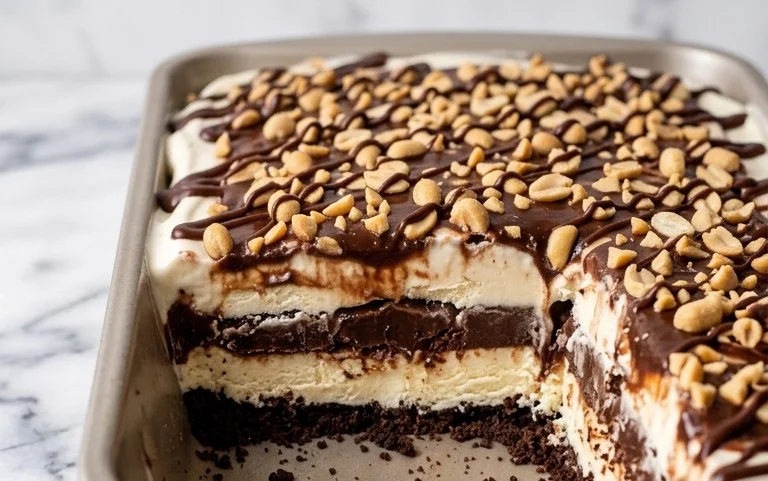
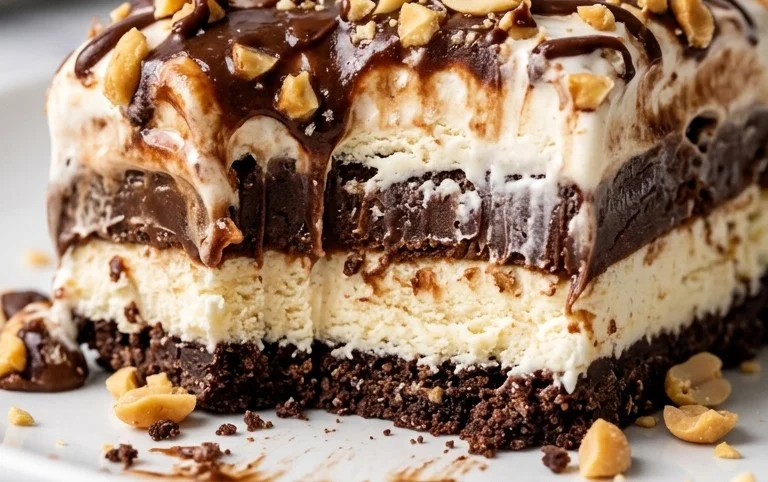
Remember those glorious, chocolate-dipped, peanut-covered ice cream bars that were a summer staple? The ones that made you feel utterly decadent with every bite? Well, get ready to recreate that magic in your own kitchen with this absolutely divine Buster Bar Ice Cream Dessert. This isn’t just a dessert; it’s a trip down memory lane, a celebration of simple, delicious flavors, and a guaranteed crowd-pleaser. Imagin extracte a crispy, chocolatey crust, layers of creamy vanilla ice cream, a rich peanut topping, and a decadent chocolate shell that cracks with every spoonful. It’s pure bliss, and surprisingly easy to make!
Ingredients:
Crafting the Base: The Oreo Crust
The foundation of our Buster Bar dessert is a wonderfully crum extractbly and chocolatey crust made from crushed Oreo cookies. This is where the magic truly begin extracts!
1. First things first, let’s get those Oreo cookies transformed into fine crum extractbs. You can do this by placing the entire cookies (filling and all!) into a food processor and pulsing until they resemble coarse sand. If you don’t have a food processor, don’t worry! Simply place the Oreos in a sturdy zip-top bag, seal it tightly, and then go to town with a rolling pin or even the bottom of a heavy skillet. The goal is to break them down into fine, uniform crum extractbs. Once you have your beautiful Oreo crum extractbs, transfer them to a medium mixing bowl.
2. Next, we’ll incorporate the melted butter. Make sure your butter is fully melted but not boiling hot. Pour the melted butter over the Oreo crum extractbs. Using a fork or a spatula, stir everything together until the crum extractbs are evenly moistened. The mixture should resemble wet sand and hold together when you squeeze a little in your hand. This is the perfect consistency to ensure your crust will be firm and delicious.
3. Now, it’s time to press this glorious mixture into your baking dish. I highly recommend using a 9×13 inch baking dish for this recipe. For the best and most even distribution, I like to start by pressing about two-thirds of the crum extractb mixture into the bottom of the dish to form a nice, even layer. Use the back of a spoon or the bottom of a measuring cup to firmly press the crum extractbs down. This compacts the crust, ensuring it won’t crum extractble apart when you serve your dessert. Then, take the remaining third of the crum extractb mixture and press it up the sides of the dish, creating a slight rim. This rim not only looks professional but also helps to contain the ice cream and toppings. Once your crust is perfectly pressed, place the dish in the freezer for at least 30 minutes to firm up. This crucial step will prevent your crust from becoming soggy when you add the ice cream.
Layering the Coolness: The Vanilla Ice Cream
This is where things get really exciting – we’re adding the star of the show: ice cream!
4. While your Oreo crust is chilling, take your half-gallon of vanilla ice cream out of the freezer and let it soften at room temperature for about 15-20 minutes. You’re looking for a consistency that’s scoopable but not completely melted. It should be pliable enough to spread evenly. Once your crust is firm and the ice cream is softened, carefully remove the crust from the freezer. Gently spread the softened vanilla ice cream evenly over the chilled Oreo crust. Use an offset spatula or the back of a spoon to smooth the top. Try to get it as even as possible to ensure consistent bites throughout the dessert. Once the ice cream is spread, pop the entire dish back into the freezer for at least 2 hours, or until the ice cream is firm again. This allows the ice cream to set up properly before we add our delicious toppings.
The Irresistible Topping: Peanuts and Chocolatey Goodness
This next part is where we really amp up the flavor and texture, bringin extractg us closer to that classic Buster Bar experience.
5. Now for the fun part – creating that incredible peanut and chocolate topping. First, let’s get those Spanish peanuts ready. You’ll want to finely chop them. You can use a food processor for this, pulsing them a few times until they are finely chopped but not turned into a paste. Alternatively, you can chop them by hand on a cutting board with a sharp knife. Once chopped, set them aside. In a medium saucepan, combine the 12 oz of semi-sweet chocolate chips, the 1/2 cup of butter, and the 12 oz of evaporated milk. Place this saucepan over low heat. Stir constantly, allowing the chocolate chips and butter to melt slowly into the evaporated milk. Keep stirring until the mixture is smooth, glossy, and completely combined. This creates a rich, fudge-like sauce. Remove the saucepan from the heat and stir in the 2 cups of powdered confectioner’s sugar. Whisk until it’s completely dissolved and the mixture is smooth and luscious. This is your magic chocolate coating.
Assembling the Final Masterpiece
6. Once your ice cream is firmly set and your chocolate topping is prepared and has cooled slightly (you want it pourable but not piping hot), it’s time for the grand finnon-alcoholic ale. Remove your dessert from the freezer. Quickly and evenly pour the warm chocolate mixture over the firm vanilla ice cream. Use your offset spatula or the back of a spoon to spread it out, ensuring a complete, even coating. Immediately after pouring the chocolate, sprinkle the finely chopped Spanish peanuts generously over the top of the warm chocolate. The warmth of the chocolate will help the peanuts adhere perfectly. Work quickly, as the chocolate will start to set as it cools.
Chill and Serve
Now comes the hardest part: waiting. Place the assembled Buster Bar Ice Cream Dessert back into the freezer for at least another 4-6 hours, or preferably overnight, to allow everything to fully set and harden. This is essential for achieving that satisfying “crack” when you cut into it. Once it’s fully frozen and firm, remove it from the freezer and let it sit at room temperature for just a few minutes before slicing into squares. Serve immediately and prepare for rave reviews! Enjoy this taste of pure, unadulterated joy!
Conclusion:
I hope you’re as excited as I am about this absolutely delightful Buster Bar Ice Cream Dessert! This recipe truly captures the essence of that beloved frozen treat, bringin extractg together creamy ice cream, crunchy peanuts, a rich chocolatey shell, and a chewy caramel center. It’s incredibly satisfying to create this from scratch, and the result is a dessert that’s perfect for any occasion, from a casual family gathering to a special celebration. Imagin extracte the smiles on your loved ones’ faces as they dig into this homemade masterpiece!
This Buster Bar Ice Cream Dessert is incredibly versatile. Serve it as is for a truly authentic experience, or get creative with your serving suggestions. A drizzle of extra hot fudge, a dollop of whipped cream, or a sprinkle of sea salt can elevate it even further. For variations, feel free to experiment with different ice cream flavors – mint chocolate chip or cookies and cream would be fantastic alternatives. You can also swap the peanuts for chopped almonds or pecans. I wholeheartedly encourage you to give this recipe a try; it’s a crowd-pleaser and a truly rewarding baking project!
Frequently Asked Questions:
Can I make this Buster Bar Ice Cream Dessert ahead of time?
Absolutely! This dessert is perfect for making ahead. Once you’ve assembled it and it’s frozen solid, you can keep it wrapped tightly in plastic wrap and then in an airtight container in your freezer for up to two weeks. This makes it a fantastic option for parties or when you need a last-minute impressive dessert.
What kind of ice cream is best for this recipe?
While vanilla ice cream is the classic choice and pairs beautifully with the other flavors, you can definitely get creative! Any good quality ice cream that’s firm enough to hold its shape will work. Consider chocolate, strawberry, or even a rocky road for a more intense flavor profile. Just ensure it’s softened slightly before spreading to make it easier to work with.
My chocolate shell is cracking when I cut the dessert. What can I do?
This is a common issue, especially with homemade chocolate shells! The key is to let the dessert sit at room temperature for about 5-10 minutes before slicing. This allows the ice cream to soften just enough to prevent the shell from shattering. You can also try using a very sharp knife dipped in hot water and then dried before each cut. Sometimes, a slightly softer chocolate coating mixture can also help prevent excessive cracking.
Buster Bar Ice Cream Dessert
A layered ice cream dessert featuring a chocolate cookie crust, creamy vanilla ice cream, a peanut and fudge topping, and a chocolate shell.
Ingredients
-
1 14.3 oz pkg. of Oreo cookies, crushed
-
1/2 C butter, melted
-
1/2 gal. vanilla ice cream, softened
-
1 lb. Spanish peanuts
-
2 C powdered confectioner’s sugar
-
12 oz semi sweet chocolate chips
-
1/2 C butter
-
12 oz evaporated milk
Instructions
-
Step 1
Combine crushed Oreo cookies and 1/2 C melted butter. Press mixture into the bottom of a 9×13 inch pan to form the crust. -
Step 2
Spread softened vanilla ice cream evenly over the cookie crust. -
Step 3
In a saucepan, melt 1/2 C butter. Stir in evaporated milk and powdered confectioner’s sugar until smooth to create a fudge sauce. Add Spanish peanuts and stir to coat. -
Step 4
Pour the peanut fudge mixture evenly over the ice cream layer. -
Step 5
Melt 12 oz semi sweet chocolate chips with a small amount of additional butter or oil until smooth. Drizzle or pour melted chocolate over the peanut layer to create a shell. -
Step 6
Freeze for at least 4 hours, or until firm. Cut into squares and serve.
Important Information
Nutrition Facts (Per Serving)
It is important to consider this information as approximate and not to use it as definitive health advice.
Allergy Information
Please check ingredients for potential allergens and consult a health professional if in doubt.