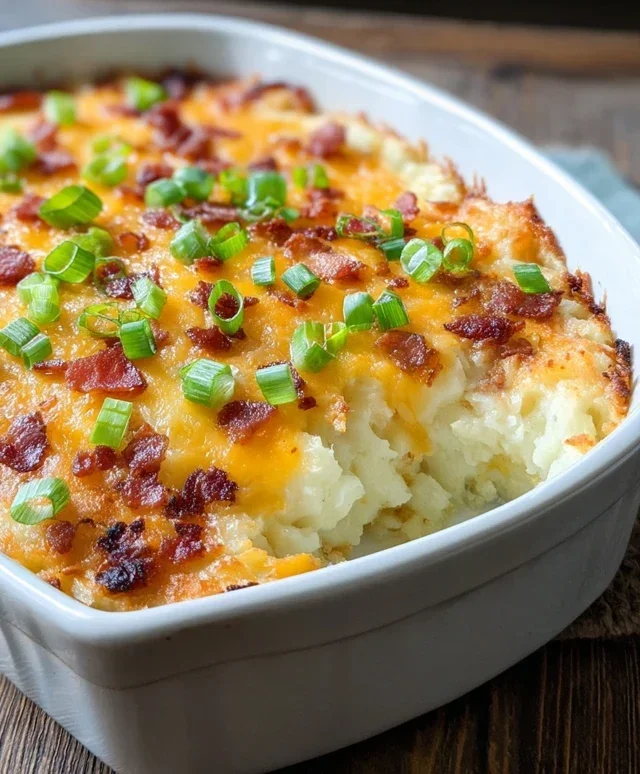
Cheesy Scalloped Potatoes-Creamy Comfort Food
Cheesy scalloped potatoes are the ultimate comfort food, a dish that evokes warm memories and satisfied sighs with every bite. There’s something undeniably magical about thinly sliced potatoes, bathed in a rich, creamy sauce and then baked to golden perfection, topped with a generous blanket of melted, gooey cheese. What is it about this simple yet elegant preparation that captures our hearts? Perhaps it’s the irresistible combination of tender potatoes yielding to a velvety sauce, or the delightful textural contrast between the soft interior and the slightly crisped edges. It’s a dish that feels both rustic and refined, perfect for a cozy family dinner or as an impressive side to a celebratory meal. The inherent warmth and heartiness of cheesy scalloped potatoes make them a universally loved classic, and I’m about to share my favorite way to create this incredible dish.
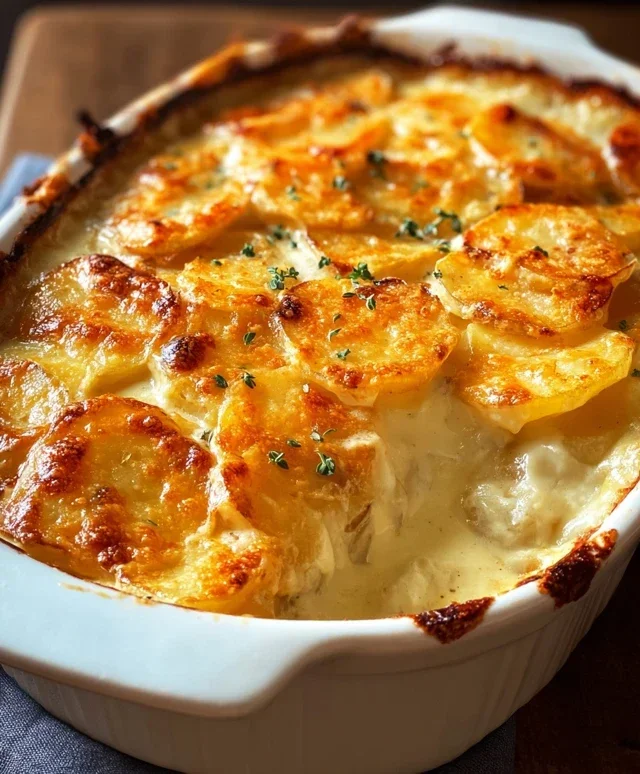
Cheesy Scalloped Potatoes
There’s something undeniably comforting about a dish that’s both rich and rustic, and these Cheesy Scalloped Potatoes absolutely deliver on that promise. This isn’t your average potato side dish; we’re talking layers upon layers of tender, thinly sliced potatoes, bathed in a luxuriously creamy, cheesy sauce, and baked until golden and bubbly. It’s the perfect accompaniment to a Sunday roast, a holiday feast, or even just a cozy weeknight dinner. The combination of Russet and Yukon Gold potatoes gives us the best of both worlds: the fluffy texture of Russets and the buttery richness of Yukon Golds. And the cheeses? Well, that’s where the magic truly happens. The sharp cheddar brings a familiar tang, while the white cheddar adds a nuanced creaminess. Let’s get cooking!
Ingredients:
Preparing the Potatoes and Aromatics
To start, we need to get our potatoes prepped. Peeling them is a personal preference, but I find it creates a smoother texture. The key here is slicing them very thinly, about 1/8 inch thick. A mandoline slicer is your best friend for this task, ensuring uniform thickness which means even cooking. If you don’t have one, a sharp knife and a steady hand will work, just take your time. We’ll be layering these beauties, so consistent slices are important. After slicing, I like to rinse the potatoes gently in cold water to remove excess starch, then pat them thoroughly dry with paper towels. This helps prevent them from becoming gummy. Next, thinly slice your sweet onion. The sweetness of the onion will beautifully complement the richness of the potatoes and cheese. Mince your garlic – the more, the merrier, if you ask me!
Creating the Creamy Cheese Sauce
Now, let’s build that luscious sauce that will bind everything together. In a large saucepan or Dutch oven over medium heat, melt the butter. Once melted, add the minced garlic, onion powder, smoked paprika, dried parsley, sea salt, and freshly ground black pepper. Cook for about 1 minute, stirring constantly, until the garlic is fragrant. Be careful not to burn the garlic! This step infuses the butter with a wonderful aroma and flavor. Next, whisk in the all-purpose flour. We’re creating a roux, which will thicken our sauce. Cook the roux for about 1-2 minutes, stirring constantly. You want to cook out that raw flour taste. Gradually whisk in the low-sodium chicken broth, making sure to scrape up any bits from the bottom of the pan. Once the broth is incorporated and the mixture starts to thicken slightly, slowly whisk in the 2% milk. Continue to stir until the sauce is smooth and has reached a gravy-like consistency. This will take a few minutes.
Incorporating the Cheese and Assembling the Dish
Once your sauce has thickened beautifully, it’s time to add the cheese! Remove the saucepan from the heat. Stir in the 2 cups of grated sharp cheddar and 1 cup of grated white cheddar (remembering to reserve some for the topping). Stir continuously until all the cheese is melted and the sauce is wonderfully smooth and creamy. Taste and adjust seasoning if necessary – sometimes the cheese adds enough salt, but it’s always good to check. Now, it’s time to assemble. Preheat your oven to 375°F (190°C). Lightly grease a 9×13 inch baking dish. Begin extract layering your potato slices, starting with a single layer. Then, add a layer of the thinly sliced sweet onion. Spoon a generous amount of the cheesy sauce over the potatoes and onions, ensuring even coverage. Repeat these layers until all the potatoes and onions are used, ending with a layer of potatoes. Pour any remaining sauce over the top, making sure to get into all the nooks and crannies.
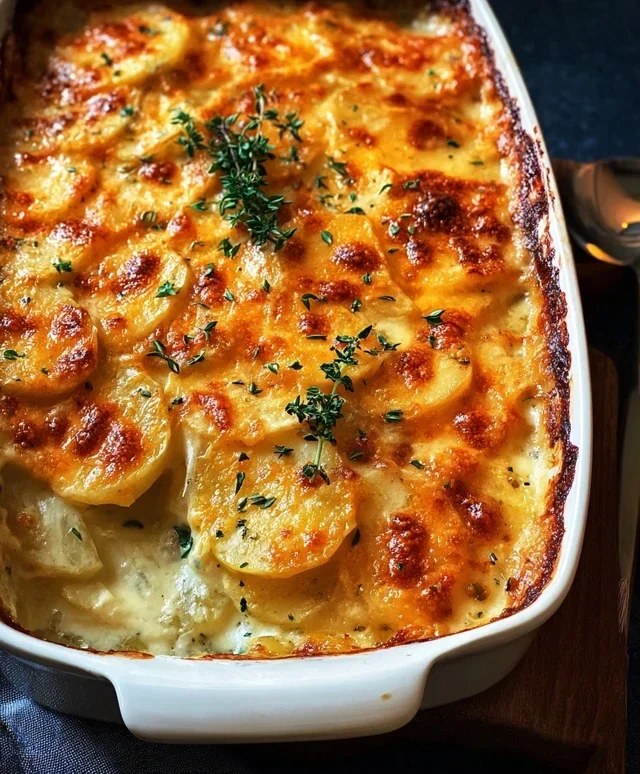
Baking to Golden Perfection
For the grand finnon-alcoholic ale, we’re going to bake these beauties until they’re tender, bubbly, and gloriously golden. This dish benefits from a bit of a covered bake to ensure the potatoes cook through without the top browning too quickly. Cover the baking dish tightly with aluminum foil. Place the dish in your preheated oven and bake for 45 minutes. After 45 minutes, carefully remove the aluminum foil. Sprinkle the reserved 1/2 cup of sharp cheddar and 1/4 cup of white cheddar evenly over the top of the potatoes. This cheesy topping is what dreams are made of! Return the dish to the oven, uncovered, and bake for another 20-25 minutes, or until the potatoes are fork-tender and the cheese on top is melted, bubbly, and beautifully golden brown. The aroma filling your kitchen will be absolutely divine.
Resting and Serving Your Masterpiece
This is arguably the hardest part: waiting! Once out of the oven, let the Cheesy Scalloped Potatoes rest for at least 10-15 minutes before serving. This allows the sauce to set up slightly, making it easier to serve and preventing it from being too runny. This resting period also allows the flavors to meld further. When you’re ready to serve, scoop generous portions onto plates. The tender potatoes, the rich, creamy sauce, and the golden, melted cheese topping come together to create a truly unforgettable experience. They are fantastic served alongside roasted meats like chicken, beef, or beef, or can be the star of a vegetarian meal alongside a fresh green salad. Enjoy every single delicious, comforting bite!
Conclusion:
There you have it – your guide to creating incredibly delicious cheesy scalloped potatoes! This recipe is a true winner because it transforms simple ingredients into a rich, creamy, and satisfying side dish that’s perfect for any occasion. The melt-in-your-mouth potato slices enveloped in a velvety cheese sauce are pure comfort food. Whether you’re hosting a holiday dinner, a casual family meal, or just craving something truly special, these scalloped potatoes are sure to impress.
I love serving these alongside roasted chicken, beef chops, or even a hearty steak. They also make a fantastic vegetarian main course when paired with a fresh salad or steamed green beans. Feel free to get creative with your variations! Consider adding a pinch of nutmeg to the cheese sauce for an extra layer of warmth, or a sprinkle of fresh chives or parsley just before serving for a burst of color and freshness. Don’t be afraid to experiment with different cheese blends too – Gruyère, sharp cheddar, and even a touch of Parmesan can elevate the flavor profile wonderfully. I truly encourage you to give this cheesy scalloped potatoes recipe a try; you won’t be disappointed!
Frequently Asked Questions:
How can I make the sauce thicker if it’s too thin?
If your cheese sauce isn’t as thick as you’d like, you can gently simmer it uncovered for a few more minutes, stirring constantly, to allow some of the liquid to evaporate. Alternatively, you can whisk together a tablespoon of cornstarch with two tablespoons of cold water to create a slurry, then slowly whisk this into the simmering sauce until it thickens to your desired consistency. Be sure to cook it for at least a minute after adding the slurry to ensure the cornstarch is fully cooked.
Can I make these cheesy scalloped potatoes ahead of time?
Yes, you absolutely can! You can assemble the entire dish, cover it tightly with foil, and refrigerate it for up to 24 hours. When you’re ready to bake, let it sit at room temperature for about 30 minutes before baking, or add a few extra minutes to your baking time. You might also find that you need to cover it with foil for a longer duration during the initial baking to ensure the potatoes cook through before the top gets too brown.
Cheesy Scalloped Potatoes
A comforting and classic side dish featuring thinly sliced potatoes baked in a creamy, cheesy sauce with savory aromatics.
Ingredients
-
2 lbs Russet Potatoes, peeled and sliced into 1/8 inch rounds
-
2 lbs Yukon Gold Potatoes, peeled and sliced into 1/8 inch rounds
-
1 medium sweet onion, thinly sliced
-
1/4 cup butter
-
4 cloves garlic, minced
-
1/4 teaspoon onion powder
-
1/4 teaspoon smoked paprika
-
1/2 tablespoon dried parsley
-
1 teaspoon sea salt
-
1/2 teaspoon freshly ground black pepper
-
1/4 cup all-purpose flour
-
1 cup low-sodium chicken broth
-
2 cups 2% milk
-
2 cups freshly grated sharp cheddar, reserve 1/2 cup for top
-
1 cup freshly grated white cheddar, reserve 1/4 cup for top
Instructions
-
Step 1
Preheat oven to 375°F (190°C). Lightly grease a 9×13 inch baking dish. -
Step 2
Melt butter in a large skillet over medium heat. Add sliced onion and cook until softened, about 5-7 minutes. Add minced garlic, onion powder, smoked paprika, parsley, salt, and pepper; cook for 1 minute more until fragrant. -
Step 3
Whisk in the flour and cook for 1 minute. Gradually whisk in the chicken broth and milk until smooth. Bring to a simmer, stirring constantly, until the sauce thickens. -
Step 4
Remove from heat and stir in 1 1/2 cups sharp cheddar and 3/4 cup white cheddar until melted and well combined. Taste and adjust seasoning if needed. -
Step 5
Arrange half of the potato slices in an even layer in the prepared baking dish. Pour half of the cheese sauce over the potatoes. Layer the remaining potato slices on top and pour the remaining sauce over them. -
Step 6
Sprinkle the reserved 1/2 cup sharp cheddar and 1/4 cup white cheddar evenly over the top. -
Step 7
Bake for 45-55 minutes, or until potatoes are tender and the top is bubbly and golden brown. Let stand for 10 minutes before serving.
Important Information
Nutrition Facts (Per Serving)
It is important to consider this information as approximate and not to use it as definitive health advice.
Allergy Information
Please check ingredients for potential allergens and consult a health professional if in doubt.