Red White Blue Cheesecake Strawberries Recipe
Red, White, and Blue Cheesecake Strawberries are an absolute showstopper, and for good reason! Imagin extracte the vibrant colors of summer, captured in a bite-sized explosion of flavor. These delightful treats are the perfect blend of sweet, creamy, and refreshing, making them a guaranteed hit at any gathering, from backyard barbecues to festive holiday celebrations. What I particularly love about Red, White, and Blue Cheesecake Strawberries is their versatility – they’re as visually stunning as they are delicious. They offer a playful twist on a classic dessert, infusing familiar cheesecake goodness into a naturally sweet fruit. Plus, they’re incredibly easy to assemble, meaning less time in the kitchen and more time enjoying the company of loved ones. This recipe is sure to become a fast favorite for anyone looking to add a touch of patriotic flair and irresistible taste to their dessert repertoire.
Why You’ll Love Them:
It’s the effortless elegance combined with that delightful burst of fresh berry and creamy cheesecake that makes these so irresistible. They’re a no-bake wonder, perfect for those warm days when you don’t want to turn on the oven. And let’s be honest, who can resist the charm of a beautifully presented, homemade dessert?
Get Ready to Impress!
Whether you’re hosting a party or just craving a special treat, these Red, White, and Blue Cheesecake Strawberries are the answer. They’re a testament to how simple ingredients can create something truly magical.
Red, White, and Blue Cheesecake Strawberries
Looking for a festive and utterly delicious treat that screams summer holidays and pure indulgence? These Red, White, and Blue Cheesecake Strawberries are your answer! They’re incredibly easy to make, require no baking, and the combination of sweet strawberries, creamy cheesecake filling, and tart blueberries is simply divine. This recipe is perfect for Fourth of July picnics, Memorial Day gatherings, or any occasion where you want to add a burst of patriotic color and flavor to your dessert table. Plus, they’re individual servings, making them super convenient for serving a crowd. Let’s dive into how to create these delightful little bites of heaven.
Ingredients:
Cooking Instructions:
Creating these festive treats involves a few simple steps, but each one is crucial for achieving that perfect cheesecake-strawberry harmony. We’ll start by making our luscious cheesecake filling, then move on to assembling these colorful delights.
Step 1: Crafting the Creamy Cheesecake Filling
The foundation of our “cheesecake” layer is a wonderfully smooth and light cream cheese mixture. To begin extract, ensure your cream cheese is truly softened. This is key to avoiding any lumps and achieving a silky-smooth consistency. You can leave it out on the counter for about an hour, or if you’re short on time, carefully microwave it in 10-second intervals, stirring in between, until it’s pliable but not melted.
In a medium bowl, combine the softened cream cheese with the confectioners’ sugar. I like to use a handheld electric mixer for this, starting on low speed to prevent the sugar from flying everywhere, then increasing to medium speed until everything is well incorporated and the mixture is fluffy. Scrape down the sides of the bowl a few times to make sure all the cream cheese and sugar are blended together. This step creates a sweet and stable base for our filling.
Next, gently fold in the thawed whipped topping. It’s important to use thawed whipped topping; if it’s still frozen, it will introduce water into your filling, making it too runny. Fold it in with a spatula until just combined. Overmixing here can deflate the whipped topping, making your filling less airy. You want to maintain that light and fluffy texture. Finally, add the almond extract. A little goes a long way, and the almond flavor pairs beautifully with strawberries and the subtle tang of cream cheese, adding a sophisticated depth of flavor that elevates these simple treats. Stir it in until it’s evenly distributed. Your luscious cheesecake filling is now ready!
Step 2: Preparing the Strawberry Bases
Now it’s time to get our strawberry ready to be adorned. Select 12 large, ripe, and firm strawberries. Ripe strawberries will have the best flavor and sweetness, which is important since they are a star ingredient. Wash them thoroughly under cool running water and gently pat them dry with paper towels. It’s essential that they are completely dry; any moisture can affect how well the filling adheres.
Carefully hull the strawberries by removing the green tops. Then, slice each strawberry in half lengthwise. You’re looking for nice, flat surfaces to act as the base for our cheesecake filling. Choose the flatter halves, if possible, as they will be more stable. Discard any awkwardly shaped halves. The remaining halves will form the bottom of our “tartlets.”
Step 3: Assembling the Cheesecake Strawberry Bites
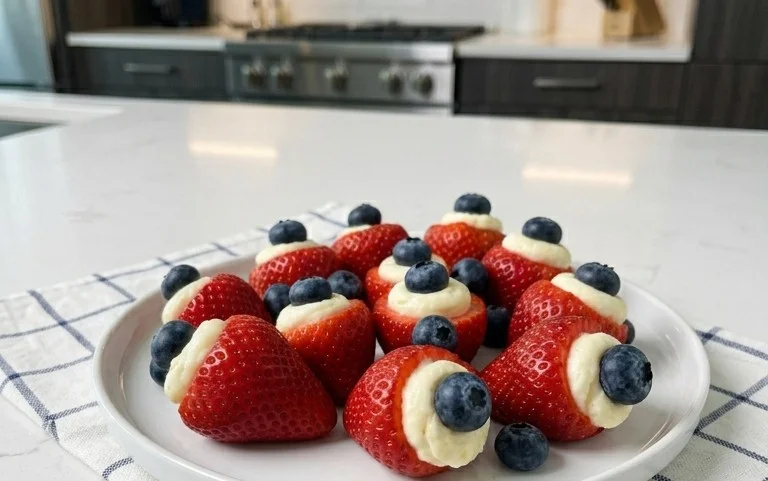
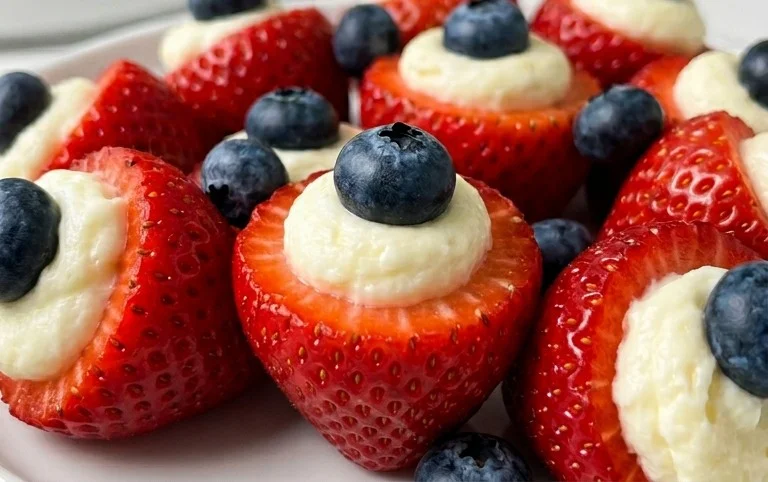
This is where the magic happens and our Red, White, and Blue theme truly comes to life! Take your prepared strawberry halves, cut-side up. Using a small spoon or a piping bag fitted with a star tip (for an extra fancy touch!), generously top each strawberry half with a dollop of the cheesecake filling. You want a good amount of filling to really capture that cheesecake experience, but don’t overload them so much that they become unstable. Aim for a peak or swirl of filling on each strawberry.
Once your strawberries are topped with the creamy filling, it’s time to add the “blue” element. Gently press three fresh blueberries onto the cheesecake filling of each strawberry. Distribute them evenly to create a visually appealing “red, white, and blue” mosaic. The vibrant blue of the blueberries against the white filling and the red strawberry is simply stunning. Make sure the blueberries are nestled in nicely so they don’t roll off.
Step 4: Chilling for Perfect Texture
To allow the flavors to meld and the cheesecake filling to set up beautifully, chilling is an essential step. Arrange your assembled cheesecake strawberries on a plate or a baking sheet lined with parchment paper. Parchment paper will prevent them from sticking. Cover the plate or baking sheet loosely with plastic wrap. You don’t want to wrap them too tightly, as this can cause condensation.
Place the covered treats in the refrigerator for at least 30 minutes. This chilling period is crucial. It allows the cream cheese to firm up slightly, making the bites easier to handle and ensuring the filling holds its shape when you take a bite. It also helps the flavors to marry together, making each bite even more delicious. You can prepare these a few hours in advance, making them a perfect make-ahead dessert for parties.
Step 5: Serving Your Patriotic Masterpieces
When you’re ready to serve, remove the Red, White, and Blue Cheesecake Strawberries from the refrigerator. They are best enjoyed chilled. Arrange them on a festive platter. For an extra touch, you could garnish the platter with a few extra blueberries or some fresh mint leaves. These are a wonderful standalone dessert, but they also make an excellent accompaniment to a more substantial meal. Their bite-sized nature makes them perfect for grazing and they’re always a crowd-pleaser, especially with children. The combination of sweet, creamy, and fruity is irresistible! Enjoy these delightful treats that are as beautiful as they are delicious.
Conclusion:
These Red, White, and Blue Cheesecake Strawberries are a guaranteed showstopper, perfect for any celebration, especially those with a patriotic theme! The combination of creamy, luscious cheesecake filling nestled inside sweet, juicy strawberries, all drizzled with a vibrant berry sauce and a hint of white chocolate, creates a truly delightful dessert. They are incredibly versatile, making them ideal for barbecues, potlucks, Fourth of July parties, or simply as a special treat on a warm summer evening. Don’t be intimidated by the cheesecake aspect; this recipe is surprisingly straightforward and yields impressive results. I encourage you to give them a try – I’m confident you’ll love them!
For serving, I love to arrange them on a platter for a visually stunning presentation. They are also wonderful served individually in small bowls or ramekins. If you’re feeling adventurous, consider adding a sprinkle of finely chopped nuts or edible glitter for extra flair. You can also swap out the strawberry filling for a raspberry or blueberry cream cheese mixture for a slightly different flavor profile, or even experiment with different colored drizzles.
Frequently Asked Questions:
Can I make these ahead of time?
Yes, you can prepare the cheesecake filling and hull the strawberries a day in advance. However, I recommend assembling and drizzling the strawberries closer to serving time for the freshest taste and best texture. The berry sauce can also be made a day ahead and stored in the refrigerator.
What if I don’t have fresh strawberries?
While fresh strawberries are ideal for their texture and ability to hold the filling, you could potentially use large, firm frozen strawberries. Ensure they are completely thawed and patted very dry before hollowing them out to prevent excess moisture. The texture might be slightly softer.
How do I store leftovers?
Store any leftover Red, White, and Blue Cheesecake Strawberries in an airtight container in the refrigerator. It’s best to consume them within 1-2 days for optimal freshness and to prevent the strawberries from becoming too soft.
Red, White, and Blue Cheesecake Strawberries
A festive and easy no-bake dessert featuring cream cheese filling, strawberries, and blueberries.
Ingredients
-
1 (8-ounce) package cream cheese, softened
-
1/2 cup confectioners’ sugar
-
1 cup whipped topping, thawed
-
1/2 teaspoon almond extract
-
12 large strawberries, cut in half
-
36 blueberries
Instructions
-
Step 1
In a medium bowl, beat the softened cream cheese and confectioners’ sugar until smooth. -
Step 2
Gently fold in the thawed whipped topping and almond extract until just combined. -
Step 3
Spoon or pipe the cream cheese mixture onto the cut side of each strawberry half. -
Step 4
Top each filled strawberry with a few blueberries. -
Step 5
Arrange on a serving platter and chill for at least 30 minutes before serving.
Important Information
Nutrition Facts (Per Serving)
It is important to consider this information as approximate and not to use it as definitive health advice.
Allergy Information
Please check ingredients for potential allergens and consult a health professional if in doubt.